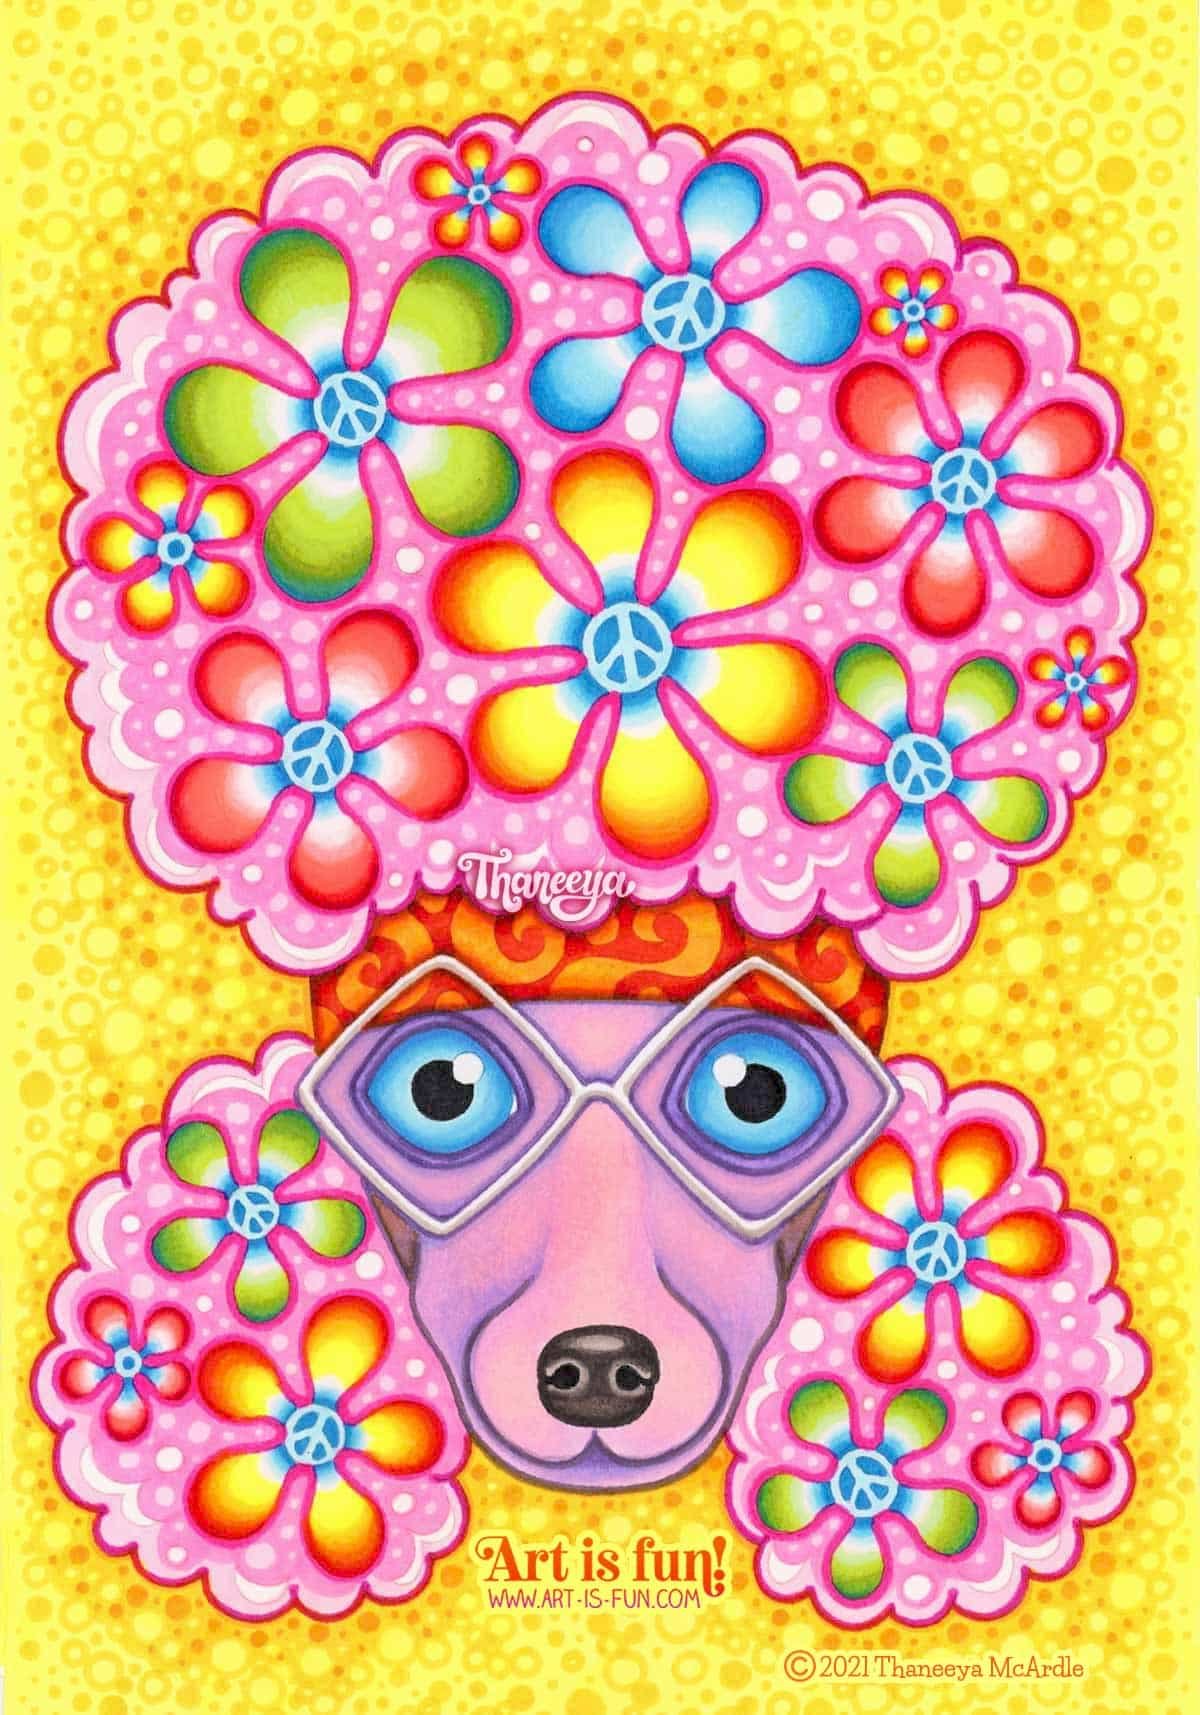
Easy Alcohol Marker Tutorial
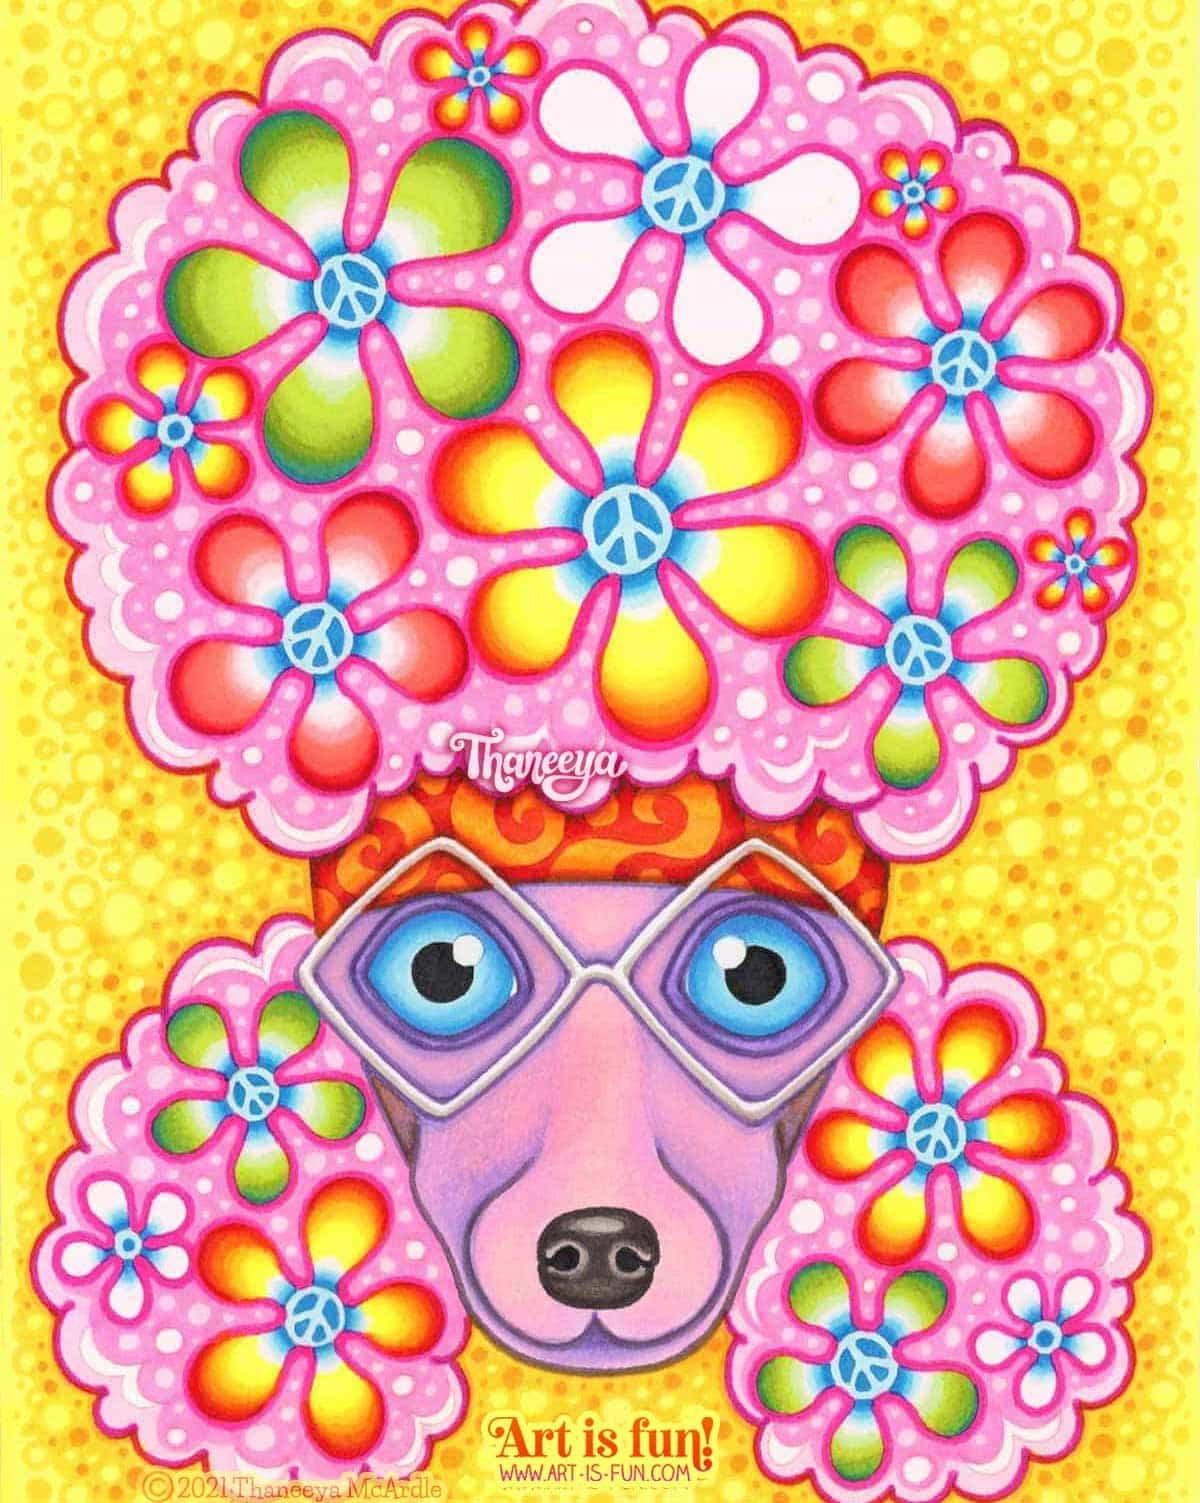
In this easy alcohol marker tutorial, you’ll learn step-by-step how to color in this groovy poodle using alcohol markers!
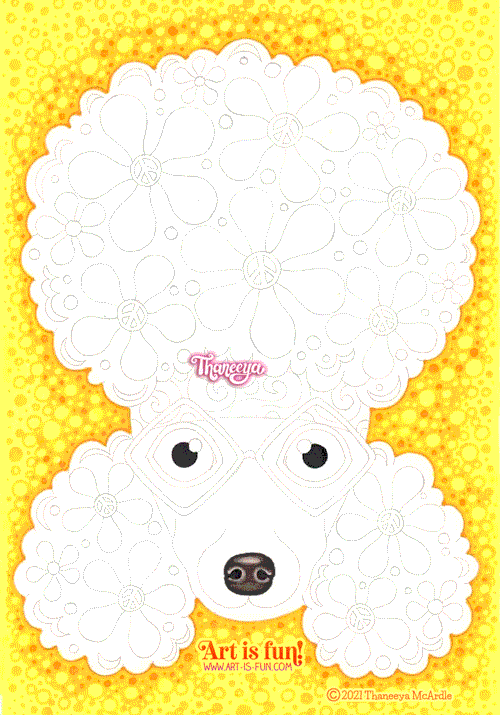
If you’d like to follow along, you can find the line art for this poodle in my Hippie Animals Coloring Book, which features 32 coloring pages of super-groovy animals just waiting to be filled with color! 😍
I colored this in using Arrtx Alp Markers, which have a fine bullet tip on one end and a chisel tip on the other.
If you don’t have Arrtx markers, you can still follow along using any brand of alcohol markers that you own! Color swatches are provided below, so you can match the colors that I used to whatever colors you have on hand.
Although I used bullet nib markers for this artwork, you can certainly use brush nib markers if you prefer. Just make sure that you’re using alcohol markers, because the techniques described here won’t work with water-based markers, which require different techniques.
When you look at the finished artwork, and browse through the steps below, it might seem rather complicated, but don’t fear! Making art is just a series of small steps, one after the other, that gradually build up to create a finished work of art. So just relax and take it one step at a time! 😊
Coloring in this poodle is relatively easy, though it helps if you already know the basics of blending alcohol markers. If you’re new to blending, check out my free alcohol marker blending tutorial, and if you want more in-depth instruction, check out my Ultimate Guide to Using Alcohol Markers!
Quick Overview
Before we get started, check out this quick animation of all the steps in this lesson! This gives you an idea of how each step builds upon the last, resulting in a whimsical work of art.
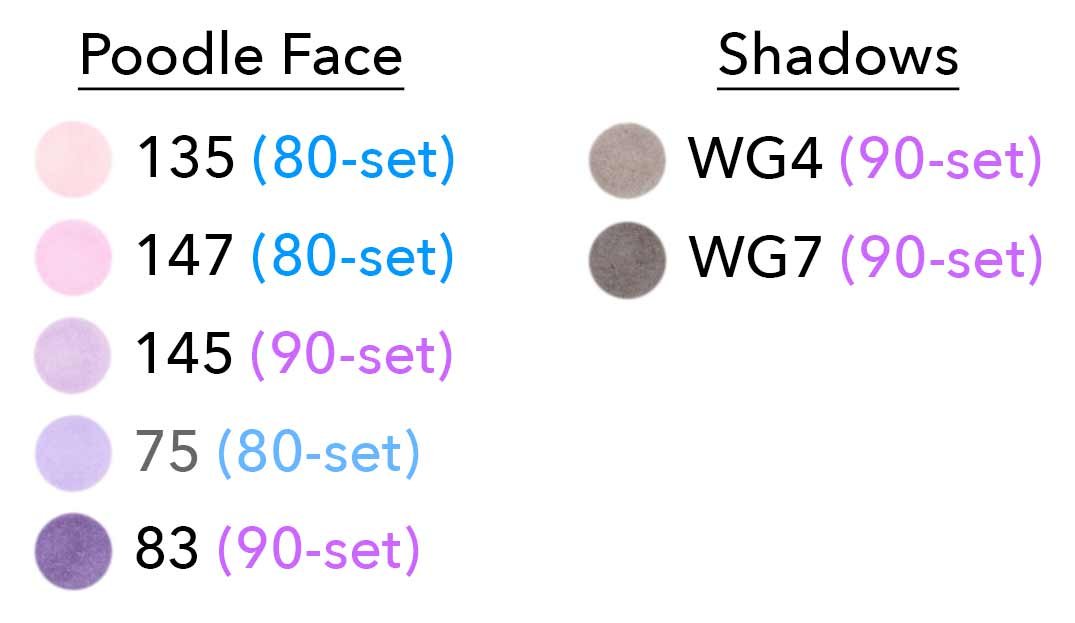
Arrtx Markers - Colors Used
Click on the color chart to view a larger version!
Here you can see a chart of all the Arrtx Alp markers that I used to color in this groovy poodle. These markers are from two separate sets: the 80-marker set and the 90-marker set (Amazon affiliate links). After each color name, you can see the set where that color can be found.
Click here to read my detailed review about Arrtx Alp alcohol markers, and find out why I highly recommend them for beginners!
If you don’t have Arrtx Alp markers, you can still follow along with this tutorial by matching the colors shown here to the colors that you have on hand using whatever brand you own. 😊
If you don’t have both of these Arrtx sets, that’s okay too! Just match the colors as best as you can.
You can also feel free to come up with your own color schemes and blending groups!
The colors are listed here in the order in which they are first used in this alcohol marker tutorial.
Alcohol Marker Paper
I used graphite paper to transfer the line art for this poodle onto Ohuhu alcohol marker paper (Amazon affiliate link). Although you can color directly on the coloring page, it’s easier to use alcohol markers on paper that is specifically designed to be used with alcohol markers.
Any brand of alcohol marker paper will do. You can also use card stock.
If you’re not sure how to transfer line art onto alcohol marker paper, I included a lesson in my Ultimate Guide to Using Alcohol Markers that demonstrates several different ways to transfer line art. 😊
Ready? Let’s begin!
Step 1
Let’s start by adding some color and fun easy details to the background. This will help frame the poodle and make it pop from the page!

Background

To color in the background, lay down a base color of 123. Use the chisel nib to quickly fill in large areas of color. Switch to the bullet nib to fill in the tighter spaces.
Next, outline the poodle with 37.
Use 37 to draw a ton of circles around the poodle, as shown in the example above. Be sure to vary the sizes of the circles, making some small and some larger. Fill in some of the circles with color, and leave some of the circles as outlines.
Use 33 to outline the poodle.
Use 33 to add more small circles around the poodle. Remember to vary the sizes of the circles.
Pupils & Nose

Use 120 (black) to fill in the pupils.
Use 120 (black) to color inside the nostrils.
Use 4 Warm Grays (WG2, WG4, WG7 and WG9) to color in the nose.
Use WG2 to create highlights on the top of the nose and next to the nostrils. These are the lightest parts of the nose.
Use WG4 along the bottom of the nose.
Use WG9 to color in the darkest parts of the nose, around the edges.
Blend the darkest areas into the lightest areas using WG7, WG4 and WG2 as needed, to create a smooth transition from light to dark.
Step 2
Now let’s color in the poodle’s groovy hairdo! We’ll start with the background, behind the flowers.
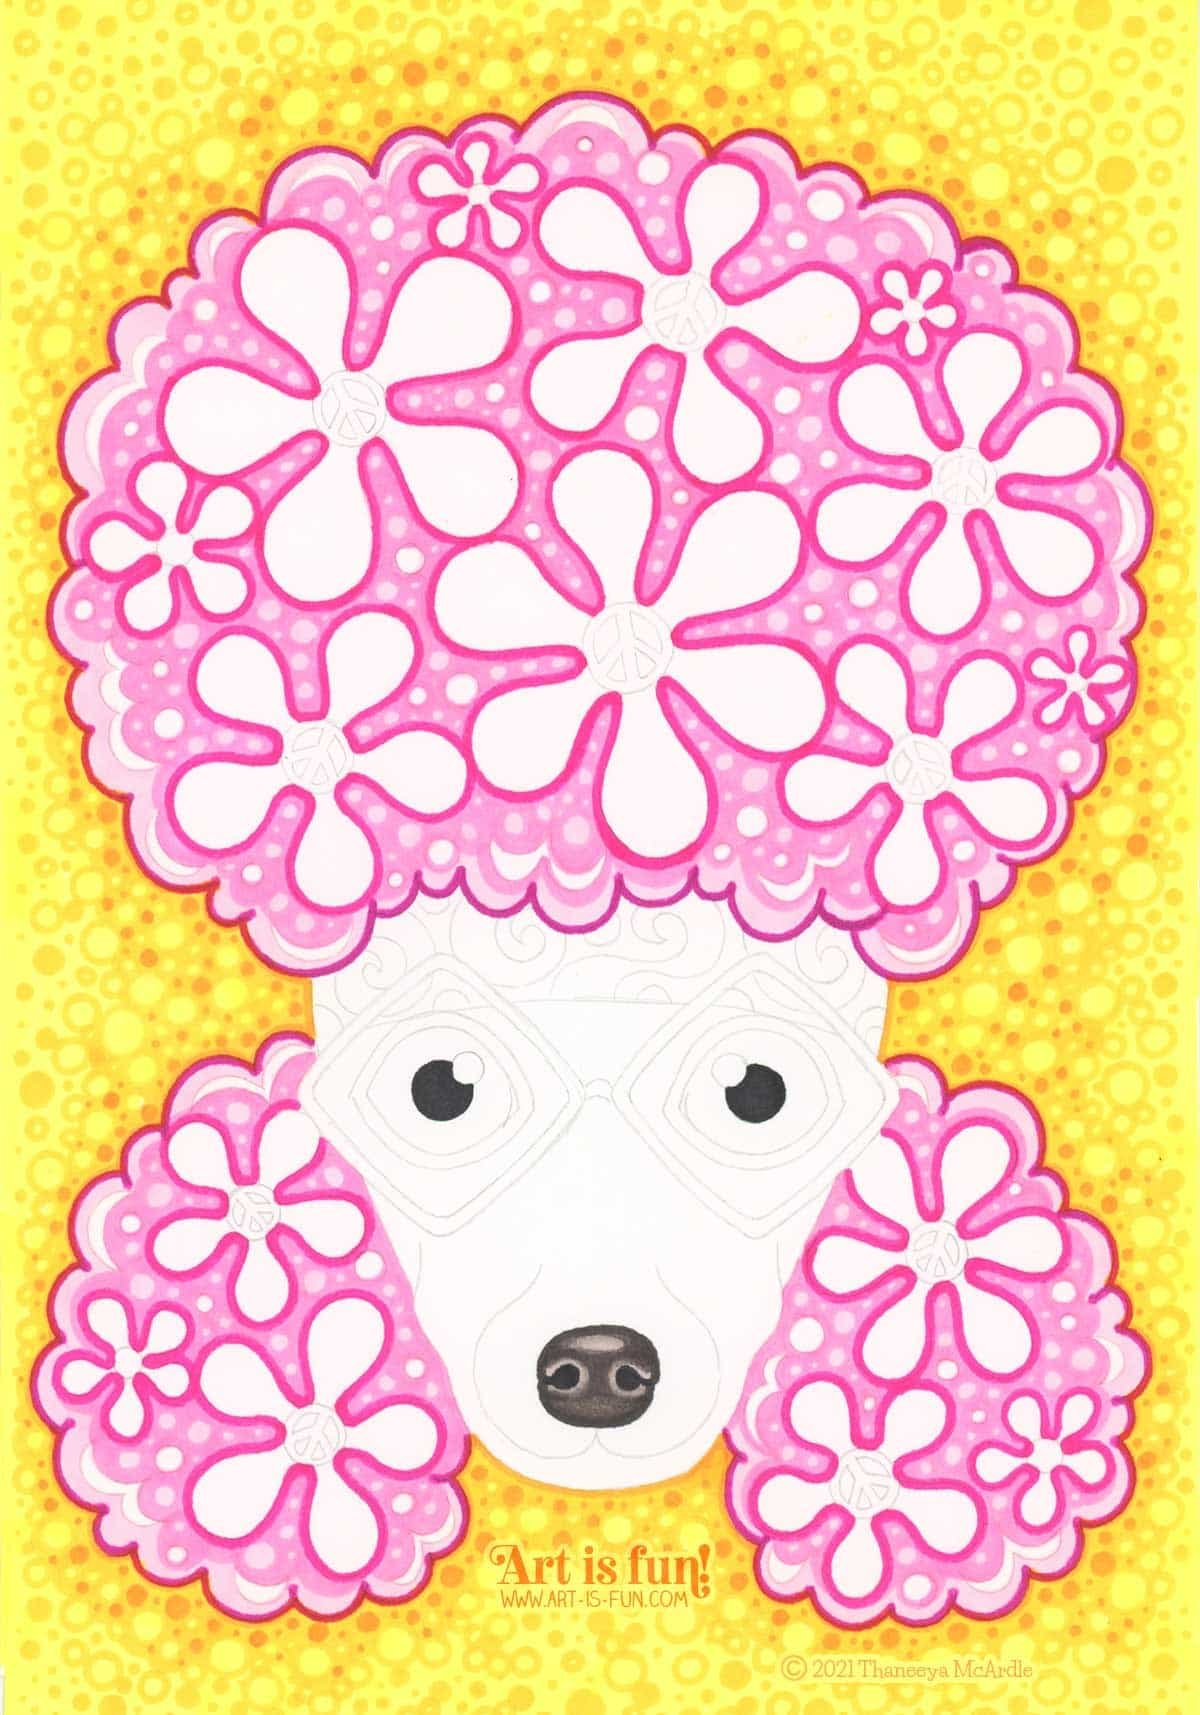

Outline the outermost edges of the hair with 87.
Outline the flowers with 125.
Use 196 along the inside edge of the hair outline.
In between the flowers, draw circles of varying sizes using 196.
Use 198 to fill in the rest of the hair. This is the hair’s main background color.
Step 3
Now let’s color in the poodle’s face! We want the lightest areas to be along the poodle’s snout, with gradual shadows along the sides and bottom of the poodle’s face. We’ll also create shading around the glasses. We’ll be going from light to dark.
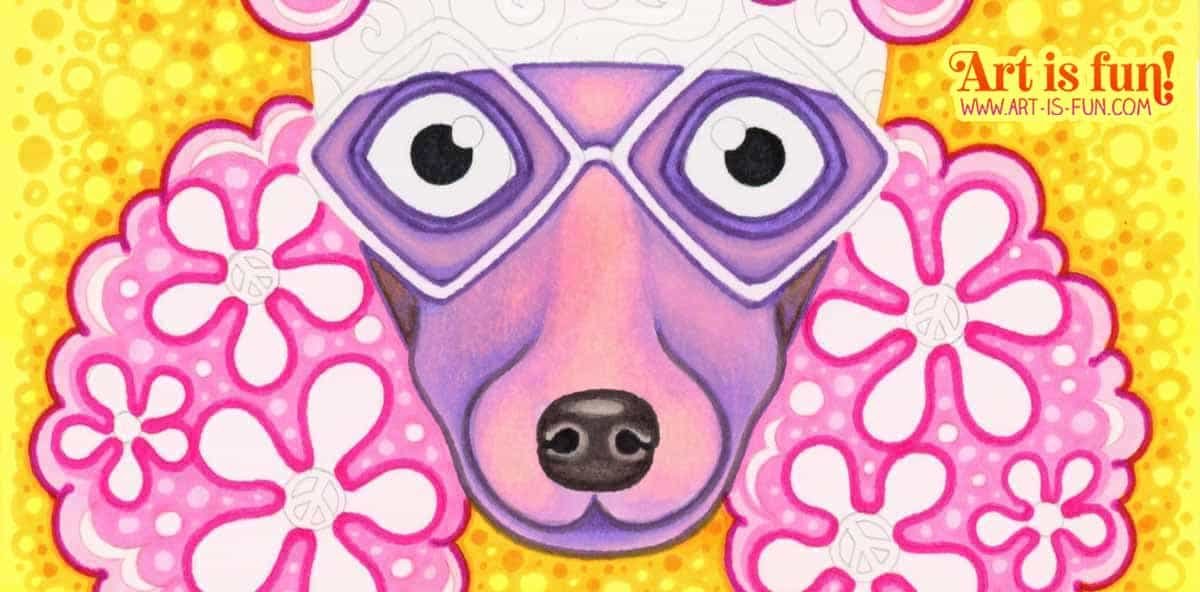
Color in the poodle’s entire face with a base layer of 135.
Use 147 to start adding some shading to the base layer.
Blend the two areas using your previous color, 135, to smooth out the transition.
Add more shading and dimension using 145 and/or 75. Note that these two colors are fairly similar, so you can choose to use just one of them if you want to.
Focus on the areas inside the glasses, in between the glasses, next to the muzzle, and below the nose. Use the previous colors to soften and blend to create a smooth transition.
Use 83 to outline the poodle’s eyes. Also outline around the glasses (inside and outside, as shown above).
Apply a layer of WG4 to the sides of the poodle’s face (below the glasses), to create extra shading.
Use WG7 to outline the muzzle and the bottom half of the poodle’s face.
Step 4
Now let’s color in the poodle’s eyes! You want them to look lighter in the center (near the pupils) and darker towards the outer edges.


Color the area around the pupils with 182.
Color the area just outside of the previous area using 185.
Use 182 to blend the 2 areas together.
Color the area just outside that using 67, going all the way to the outer edges of the irises.
Blend it in using the previous color, 185.
Use 76 to outline the furthermost edge of the irises. Use your previous color(s) to smooth out the transitions of color.
Step 5
Now let’s color in the background of that groovy headband!


Color in the background of the headband using 22. Be sure to leave the swirls white, as shown above.
Use 94 for the darkest parts, which are around the edges of the headband, underneath the hair, along the sides and bottom, and around the glasses.
Use 12 to smooth out the transition between the two previous colors.
Step 6
Time to finish the groovy headband by coloring in the swirls!

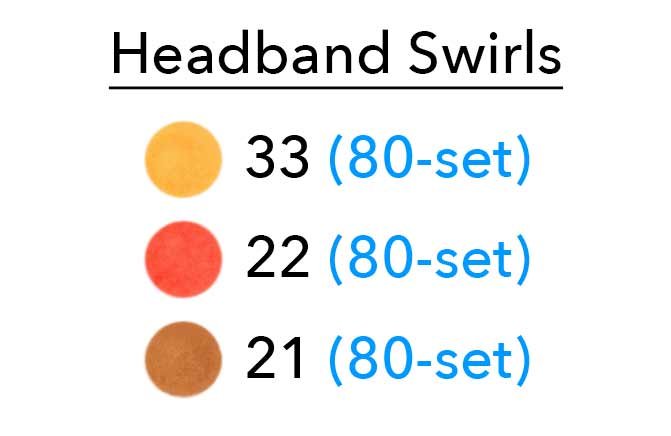
Color in the swirls using 33.
Use 21 for the darkest areas, which are around the edges of the headband, underneath the hair, along the sides and bottom, and around the glasses.
Use 22 to smooth out the transition between the two previous colors.
Use 33 again to smooth out the transition between 22 and 33.
Step 7
This next step is pretty easy—we’re just adding a touch of shading to the frames of the glasses, to give them a sense of dimension.


Imagine that there’s a light source coming from above. Use WG2 to draw a line along the bottom edges of the eyeglass frames, and along the nose bridge, as you see above.
Step 8
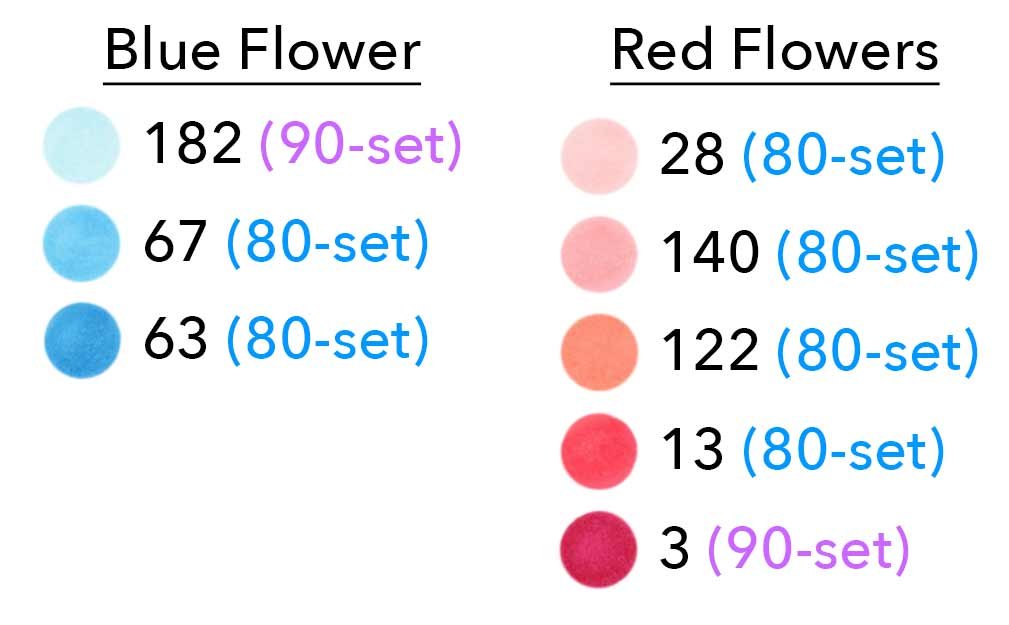
Now let’s color in the centers of the flowers! The bigger flowers have peace signs in the center, while the smaller flowers just have a circle.


Use the lightest blue, 182, to color in the centers of the flowers.
Use 67 to color the insides of the peace signs and the insides of the smaller circle centers.
Use 67 to color around the outside of the center peace signs and circles.
Add 182 to blend 67 into the white of the petals.
Use the Colorless Blender to soften the transition from the light blue color to the white of the paper.
Use 63 to add a darker layer of color around the outside edge of the central circles and peace signs.
Use the previous colors to smooth the darkest color into the other colors.
Step 9
Now let’s start coloring in the flowers! We’ll color them in using different color families, starting with greens.


Use your lightest color, 173, to color in the petals of the flowers shown above. Leave a gap between 173 and the light blue, so that the white of the paper shows through.
Use your Colorless Blender to blend the light green into the white of the paper.
You want 173 to show through for most of the petals, to give them a vibrant appearance. Near the ends of the petals, add 48, and then use 173 to soften the edge.
Use 124 if needed, to help soften the transition between the two previous colors.
Add 59 near the ends of the petals, and smooth it out with the previous color.
Use 58 to darken the tips of the petals even more, and use your previous color to blend it in.
If desired, use 65 along the very far edges of each petal, to make them even darker. Blend in using previous colors as needed.
Step 10
Let’s color in more flowers! We’ll color in the 3 flowers shown below, using a yellow-to-red color scheme.


You’ll be doing a similar process to how you colored in the previous green flowers. By now you’ve gotten the hang of blending, so these directions will be a bit shorter.
Start with 123, and color in the petals. Leave a white (blank) gap in between the yellow and the blue at the center of the flower.
Use your Colorless Blender to blend the yellow into the white of the paper.
For the largest flower, use the remaining colors—37, 33, 24, 22 and 12—to create a smooth blend from yellow to red at the tips.
For the smaller flowers, you won’t be able to fit as many colors in, so you’ll use fewer colors (something like 33, 24 and 12).
Step 11
Let’s color in more flowers!


We’ll color in two of the flowers on the top of the head using these tints and shades of red.
By now, you get the process of coloring in these petals, so I won’t bore you with redundant instructions. 😊
Use 28, 140, 122, 13, and 3 to color in these petals.
Use your darkest color, 3, just on the very tips of the petals.
Remember to leave a blank gap between 28 and the blue in the center of the flower, and use your Colorless Blender to blend 28 into the white of the paper.
Step 12
Let’s color in a few more flowers!
We’ll use the same yellow, orange and red colors that we used in Step 10.
We’ll color in 2 of the small flowers at the top of the head, and 2 of the medium-sized flowers on either sides of the poodle’s face.
Using the same techniques as before, color in these flowers using 123, 37, 33, 24, 22 and 12.
Some of the flowers are small, so feel free to omit any colors as needed. You won’t be able to use all these colors in those tight spaces, but that’s okay.
Step 13
Now let’s color in the last 3 flowers!
Only 3 more flowers to go!
Color in the top flower using the same blue colors that we used for the centers of the flowers in Step 8.
Color in the 2 smaller flowers using the same red colors as in Step 11.
Now you’re done with all the flowers!
Step 14
The next step is pretty subtle, so it’s easier to show you a before-and-after in this animated GIF:

Make the poodle’s head pop a bit more against the background by adding a subtle shadow.

Use 8 to draw an outline around the poodle.
You can outline the entire poodle if you want.
Or, you can do what I did and create a drop shadow effect by pretending that there’s a light source coming from above. In that case, don’t draw an outline around the top of the head or the top of the bottom tufts of hair.
Also draw a shadow on the sides of the poodle’s face (next to the headband and on top of the lower tufts of hair).
You don’t need to worry about doing any additional blending. Just add this one layer of color and you can see the effect!
Step 15
And now for some finishing touches! This part is optional, so you can skip it if you want.

Use a white paint pen or white gel pen to create tiny dots on:
the poodle’s eyes
the headband
the frame of the glasses.
My favorite tools to use for this are either a white Posca paint pen or a white Uni-ball Signo gel pen. (I usually reach for the Posca!)
All finished!
And now you’re all done!
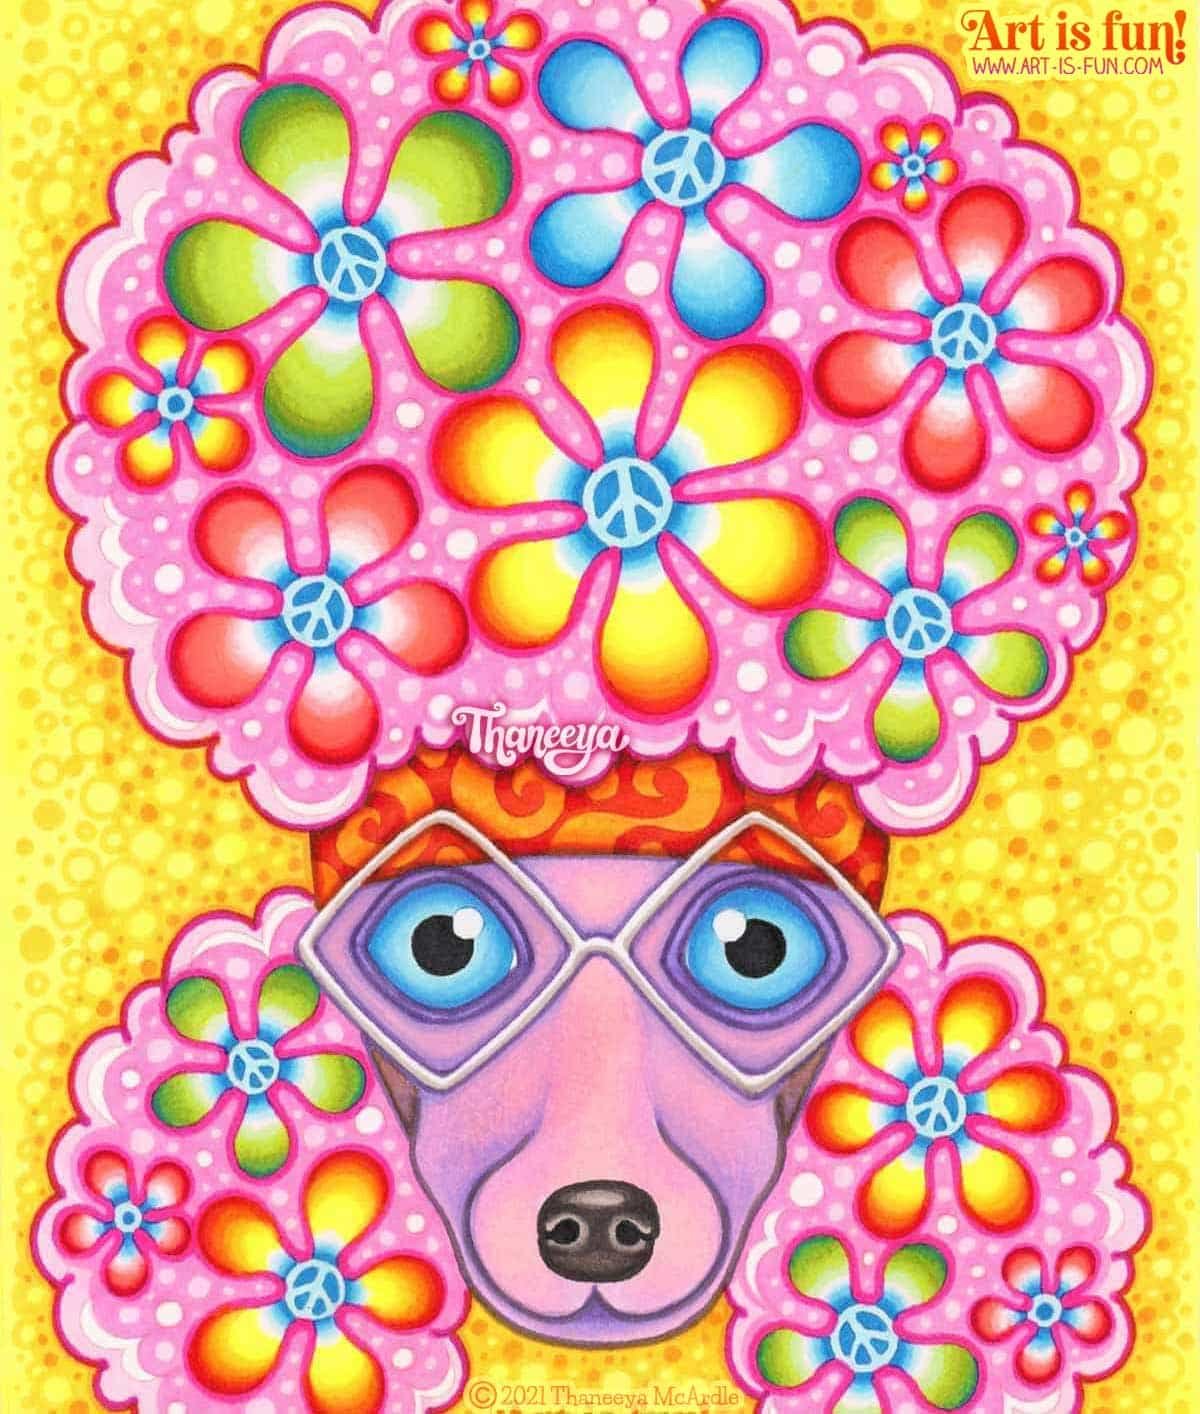
Here’s the final result!
😍 So groovy! 😍
I hope you enjoyed this easy alcohol marker tutorial! 😃
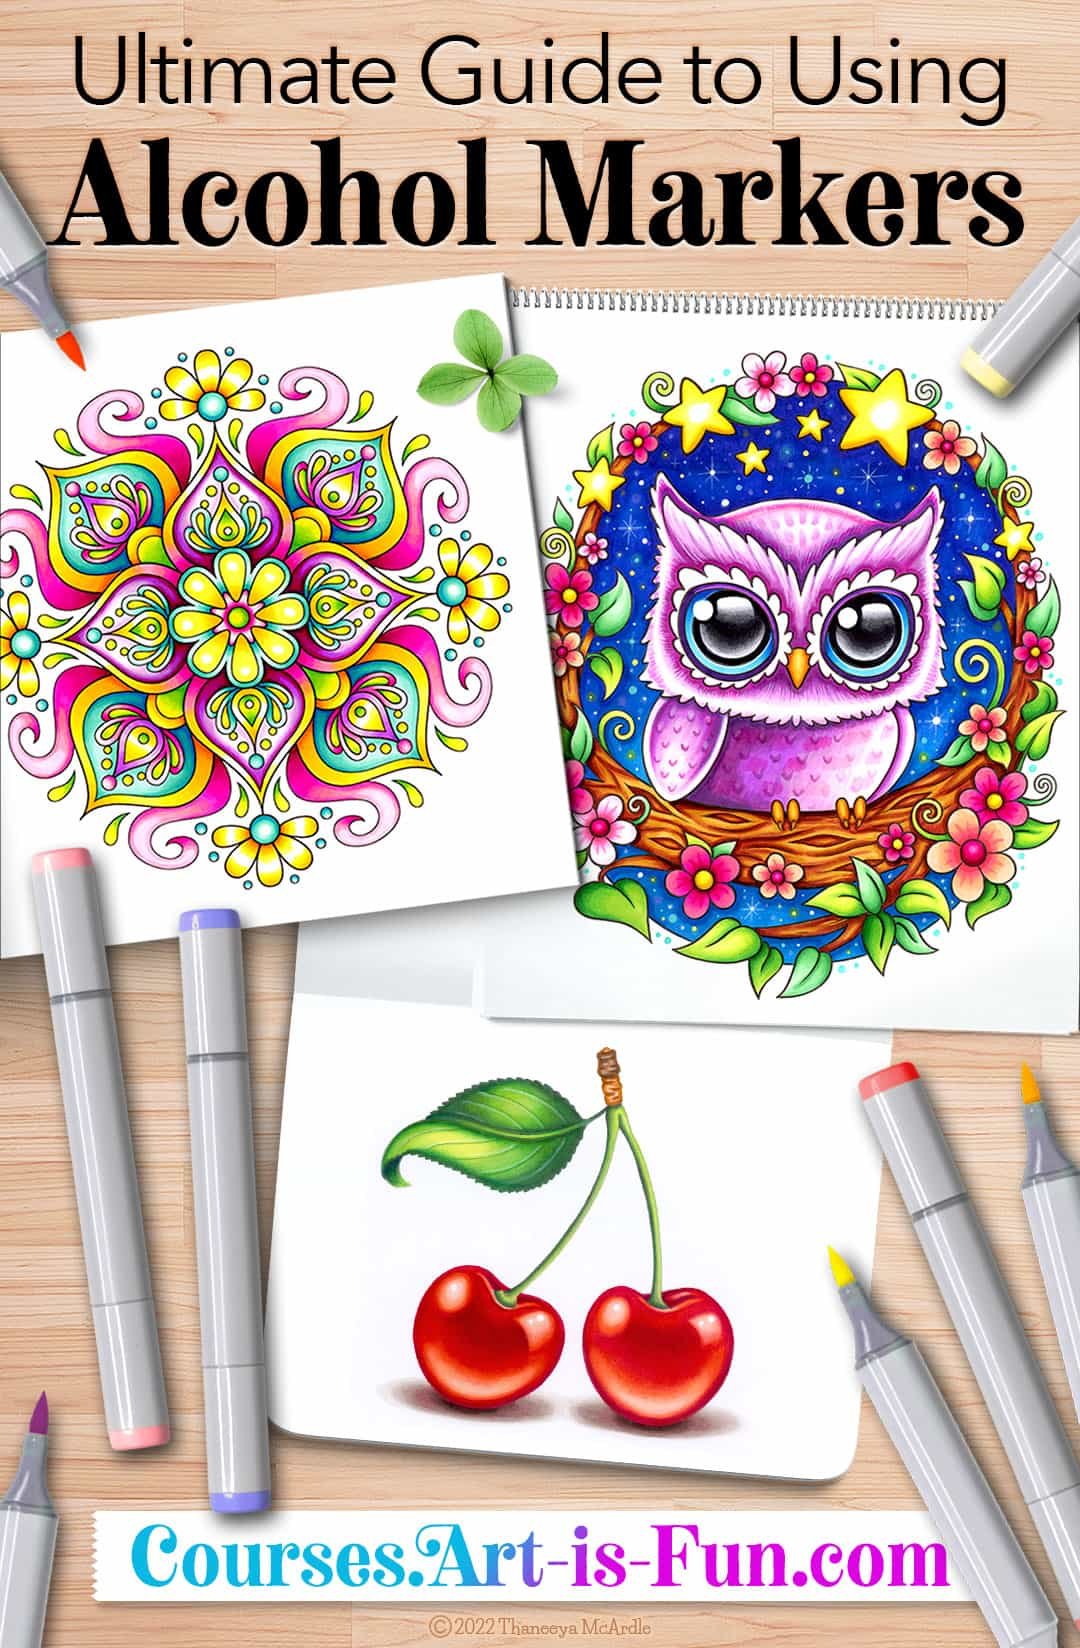
Ultimate Guide to Using Alcohol Markers
If you want to learn more about how to blend and use alcohol markers, check out my Ultimate Guide to Using Alcohol Markers! It’s a comprehensive online video course in which I go WAY more in-depth with detailed lessons about different blending techniques, blending theory, and more.
This course is designed to take you from a complete beginner level to an advanced level, with over 11 hours of instructional video and over 50 pages of downloaded resources (printable line art, blending formulas, and more)!
I’ll also walk you step-by-step through the process of creating the 3 works of art you see below: a luminescent mandala, a whimsical owl, and vibrantly realistic cherries! Click below to watch the course trailer and see everything this course has to offer! 😍
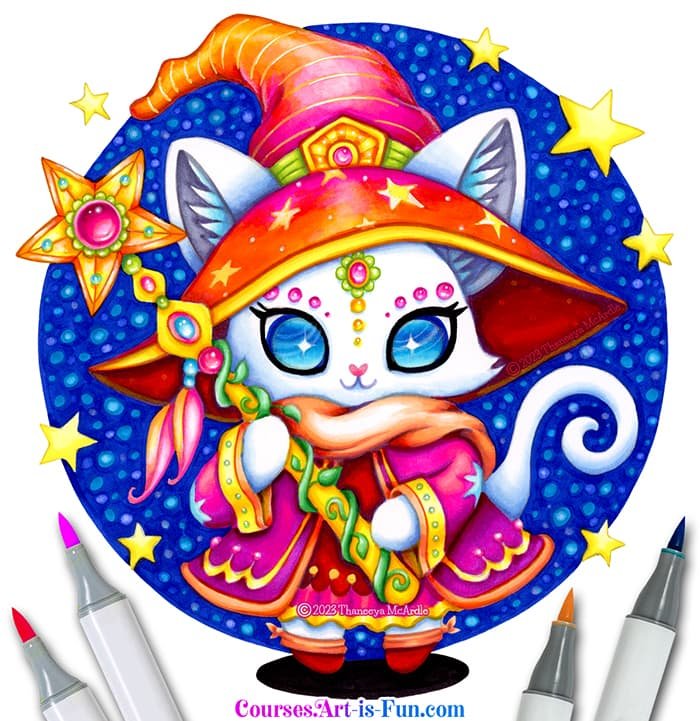
Color in this adorable cat
If you love cute kawaii art, check out my Wizard Cat Alcohol Markers Course! Print out the line art and dive right in as I demonstrate step-by-step how to color in the adorable cat illustration below using Ohuhu Markers. Color names and swatches are provided for both Copic and Ohuhu, so you can easily follow along!
Keep learning…
Go back to the main alcohol markers Table of Contents.
Read my detailed reviews about different alcohol marker brands.
Create more art with my step-by-step alcohol marker tutorials!
See a gallery of alcohol marker art and get inspired by the possibilities!
Sign up for my free alcohol markers course!
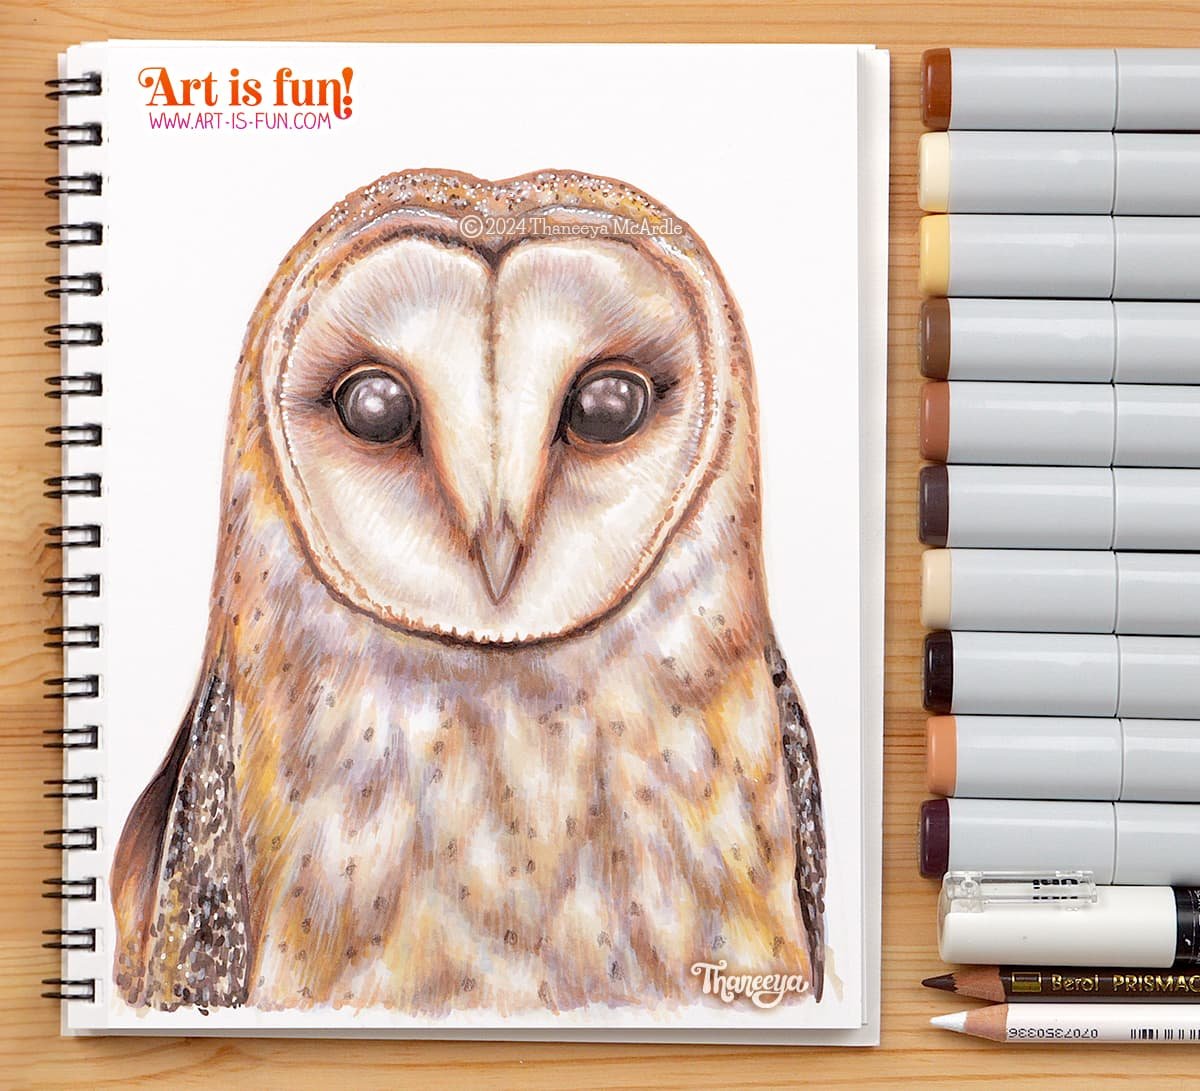
Realistic alcohol marker techniques
It took me 2.5 hours to draw this cute owl using Copic Markers. Check out my article and video to learn the best alcohol marker blending techniques for creating realistic art!