Frog Colored Pencil Tutorial
Follow along as I color in this whimsical frog coloring page from my Woodland Mandalas Coloring Book! Here’s a quick video that shows you all the steps and stages that this illustration went through as I colored it in using Prismacolor Premier Colored Pencils. If you like what you see, then get out your colored pencils and join me in this detailed colored pencil tutorial!
In this detailed “Color Along” tutorial I’ll show you all the colors I used to color in this page from my Woodland Mandalas Coloring Book using Prismacolor Premier Colored Pencils. I’ve included the specific colored pencil numbers for each step. I’ve also included color swatches (below) so that if you don’t have Prismacolor Premier Colored Pencils, you can still follow along by matching the color on the screen to the colors that you have.
If you can’t match the colors exactly, that’s totally okay! Colors tend to look slightly different on different screens and monitors, so seriously, don’t worry about matching these colors exactly. Just relax and have fun as you color!
List of colors used in this tutorial
Prismacolor Premier Colored Pencils
The colors are listed in the order that they first appear in this tutorial, starting from upper left (Tuscan Red) and going down the columns (ending with Spring Green).
If you don’t have all of these colors available, that’s totally okay! Note that some colors look pretty similar—for example, Yellowed Orange 1002 and Spanish Orange 1003 are rather similar, although the latter is a tad lighter. So, if you don’t have Spanish Orange you can simply use Yellowed Orange or any other similar color that you do have. The important thing is not to stress and to just enjoy the process!
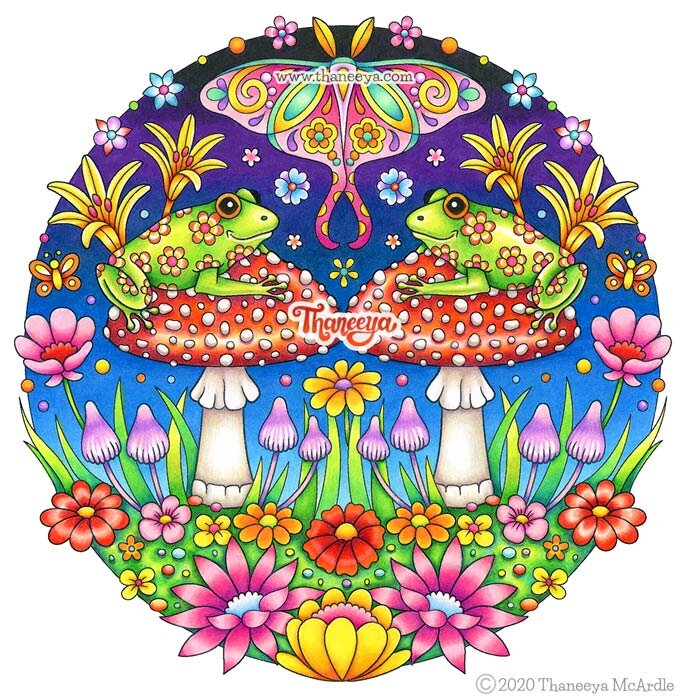
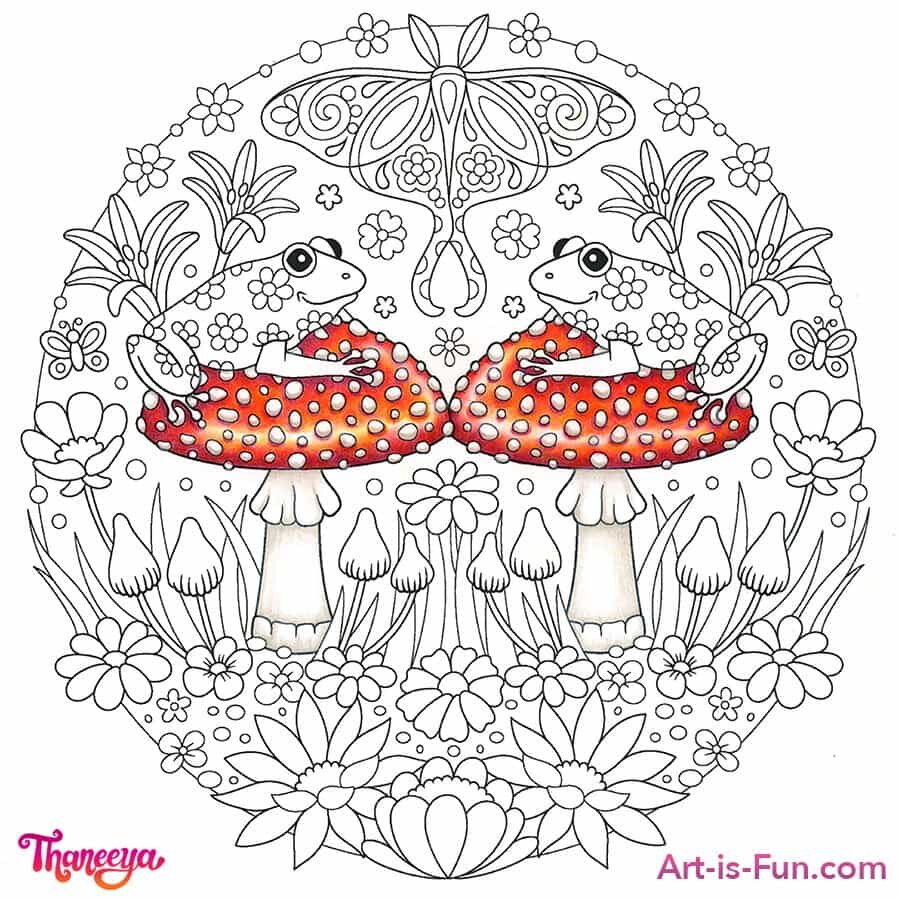
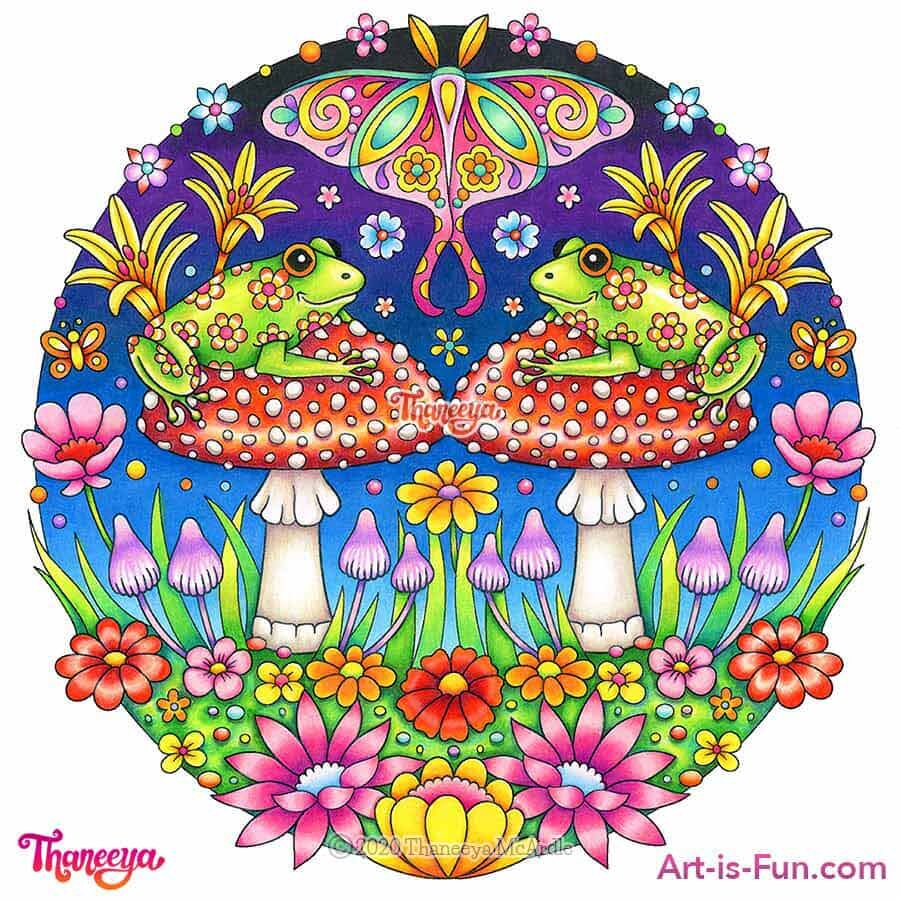
Frog coloring page from Thaneeya McArdle’s Woodland Mandalas Coloring Book
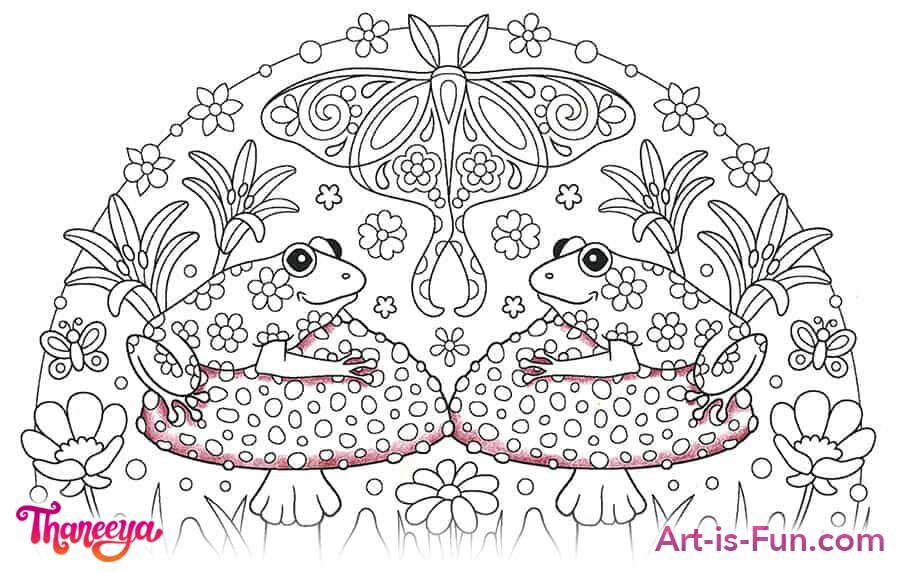
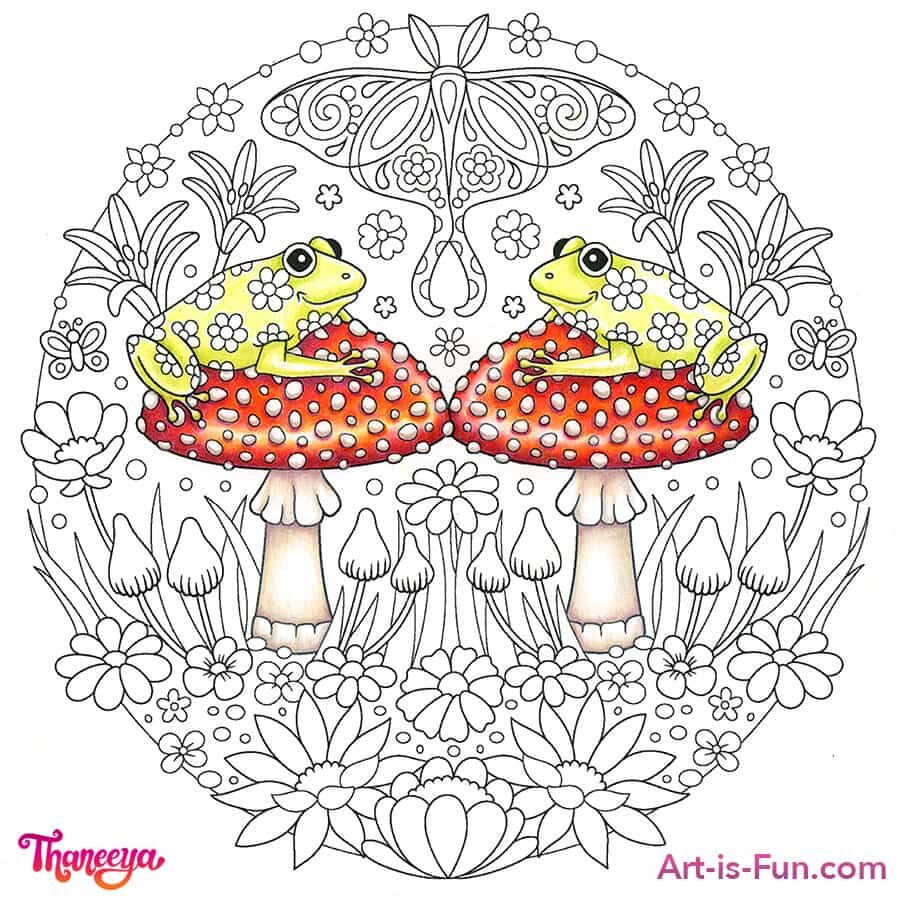
Here’s a pic of the finished colored pencil illustration! To color along, you’ll need this coloring page from my Woodland Mandalas Coloring Book. When you purchase my coloring books, you’re directly supporting the livelihood of a self-employed artist, as well as supporting a small, independent publishing company, so we thank you kindly for your support! Your support also helps enable me to create free detailed tutorials like this one that everyone can learn from!
You can also find this full-size colored example in my Woodland Mandalas Coloring Book, so feel free to refer to it as you color along with this tutorial!
As you progress through the steps of this colored pencil tutorial, you’ll learn which colors go together to create depth and shading. This is useful knowledge that you will take with you when you create your own colored pencil drawings or color in other coloring pages!
“Tip: In general, when using colored pencils, you’ll want to press lightly as you first lay down the colors. The key to creating depth and dimension in your artwork is to layer different colors, so using light pressure in the beginning is key. Then, as your colors build, you’ll begin to press harder to blend the colors more and create a smooth appearance. The danger of pressing too hard in the beginning is that it can create a slick surface that makes it hard to layer any more colors in top. Don’t worry if this is new to you—it will soon become natural to you with practice!”
Ready? Let’s begin!
Colored Pencil Frogs Tutorial
Step 1
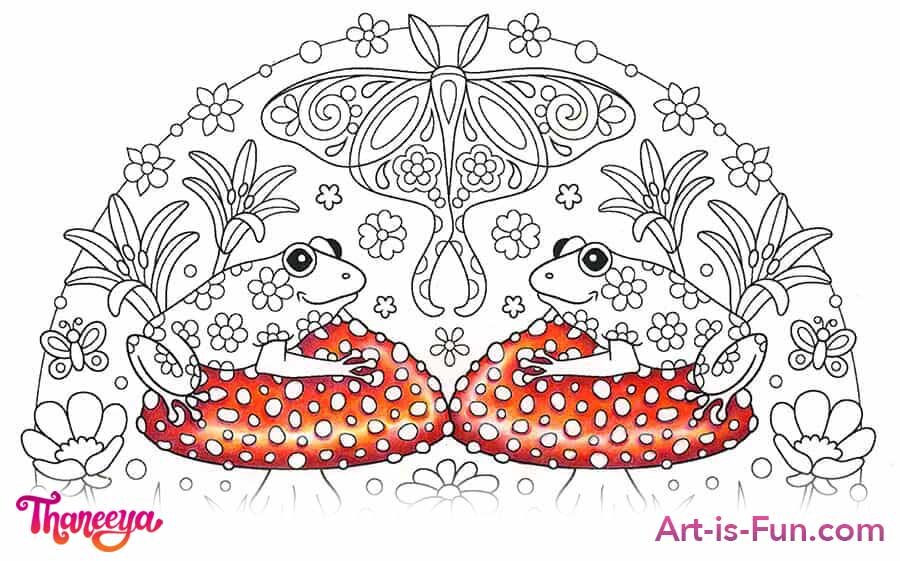
Use Tuscan Red 937 to create shadows along the bottoms of the mushroom caps, as well as underneath the frogs.
Step 2
Color in the main color of the mushrooms using Poppy Red 922. Just inside the outer edges of the mushrooms, leave an empty strip to allow the white of the paper to show through, which will become highlights that will help give the mushrooms depth.

Step 3
Deepen the shadows under the frogs and along the bottom edge of the mushrooms using Raspberry 1030.

Step 4
Go over the areas you’ve previously colored using Poppy Red 922, pressing harder to really rub the pigment into the paper, creating a smooth appearance. Use Yellowed Orange 1002 where the red transitions to the white highlight to add a bit of extra oopmh and brightness. Use White 938 on top of the highlight, as well as along the edge of the highlight, to create a smoother transition.
In the image below, you can see the difference between the left mushroom (which is how it will look after this step is completed) and the right mushroom (which is how it looks before).

Step 5
Next, do the same on right mushroom cap, using the colors mentioned in Step 4.
Step 6
Start adding some dimension to the mushroom stalks using French Grey 20% 1069 to lightly shade under the mushroom caps, along the stalk edges and the bottoms of the stalks.

Step 7
Deepen the shadows on the stalks using French Grey 30% 1070 on the areas where the shadows will be the darkest, which is directly underneath the caps, along the top and bottom edges of the middle sections of the stalks, and just along the very bottom of the stalks. Don’t press too hard yet, because soon we’ll be adding a couple more colors to deepen the shadows further.
Also, use French Grey 30% 1070 to add shadows along the bottom edges of the dots on the mushroom caps.
Step 8
Lightly apply Ginger Root 1084 to add more warmth to the mushroom stalks. Compare the pics from Step 8 and the previous Step 7 to see where to apply the color.

Step 9
Deepen the shadows on the stalks using Rosy Beige 1019 and Clay Rose 1017 in the places where the shadows will be darkest.

Step 10
Now let’s work on the frogs!
Use Yellow Chartreuse 1004 to lightly color in the frogs’ bodies. This color will help give the frogs a yellowish glow. Don’t press too hard because you’ll be adding more layers of colors.

Step 11
Create some light shading on the frogs using Limepeel 1005 on the areas underneath and around the eyes, above and below the mouths, and along the frogs’ chests and legs. Don’t press hard at this point because we’ll be adding more colors to darken the shadows.
Step 12
Now you’ll use Chartreuse 989 to lightly color in most of the frog. This color is lighter than Limepeel 1005 but darker than Yellow Chartreuse 1004 (which are the 2 previous colors that you just used), so use it on top of Yellow Chartreuse 1004 to help darken the frog a little.

Step 13
Use Grass Green 909 to create the darker shadows on the frogs. If needed, use Limepeel 1005 again to smooth out your transitions.

Step 14
Color in the eyes using Yellowed Orange 1002 for the tops of the eyes and Pale Vermilion 921 for the bottoms of the eyes. Also, add the darkest shadows to the frogs using Dark Green 908. You only need to add a few touches of Dark Green 908, for example under the eyes and on the belly next to the legs.

Step 15
Now let’s work on the blades of grass!
Use Chartreuse 913, True Green 910, Parrot Green 1006 and Peacock Green 907 to create blends from light to dark. The lightest color is Chartreuse 913 which acts as a nice highlight on the blades of grass. For variety you can color some blades without using Chartreuse 913, as you can see I did below.

Step 16
Use the previous 4 colors to color in the rest of the grass. Start by lightly coloring in little blobs of color, which will create a nice sense of variety in the grass.

Step 17
Darken the grass using Dark Green 908 and Peacock Green 907 to create shadows underneath the flowers. Smooth out the transitions from light to dark using Parrot Green 1006 and Grass Green 909. Below you can see how this looks partway through the process of darkening the grass.

Step 18
Continue darkening the grass using the colors mentioned in Step 17. Below you can see how this looks when the process is completed.

Step 19
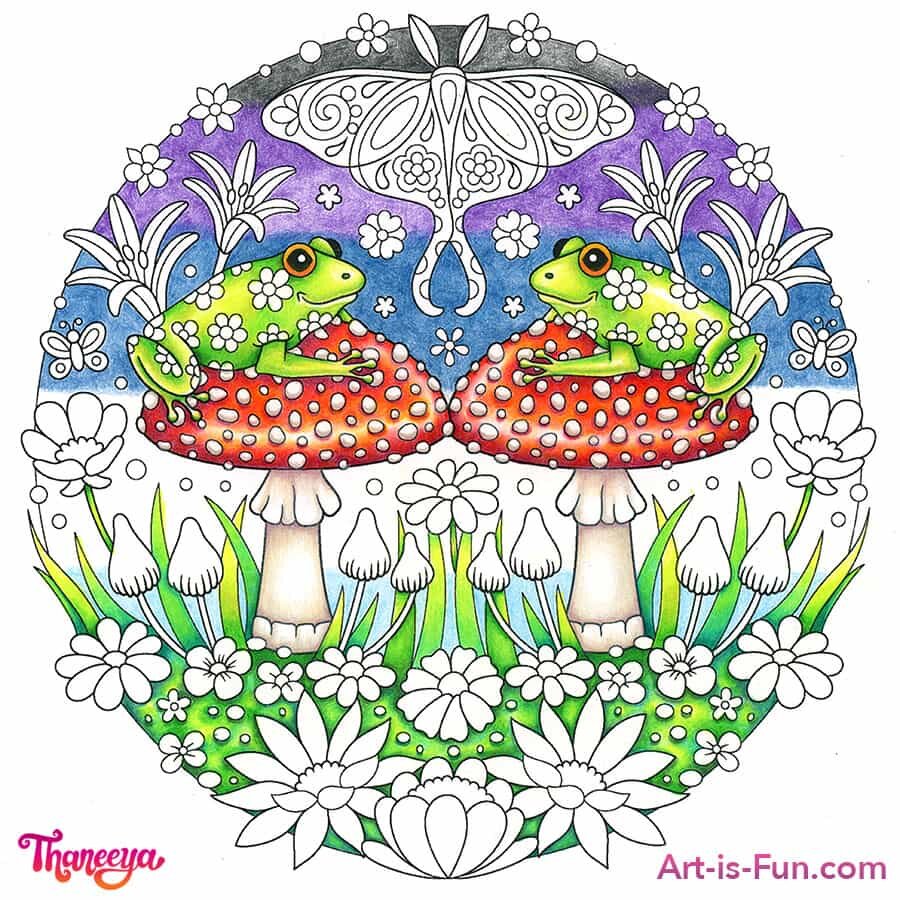
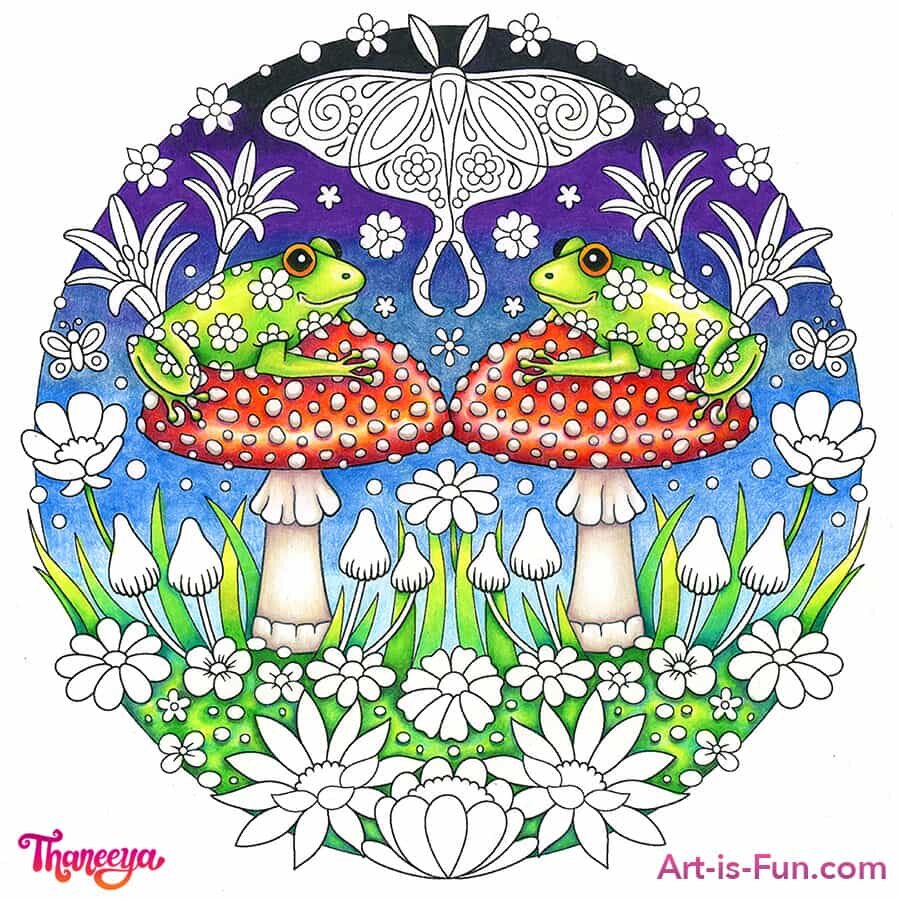
Now let’s start on the sky!
In Steps 19 - 29 we’ll create a gradient that goes from dark to light as you go from top to bottom, also known as an ombré. Start by lightly coloring in the top of the sky using Black 935. Color in the bottom of the sky, in between the grass blades, using Non-Photo Blue 919.
“Tip: When coloring in large spaces, it’s best to color lightly in small, overlapping circles, which will result in a smoother appearance. If you color in straight lines using a back and forth motion, it can look choppy and uneven, especially if you apply too much pressure.”

Step 20
Underneath the black strip at the top, color in a purple strip using Violet 932. Below that, color in a dark blue strip using Indigo Blue 901. Press lightly so that the paper retains its tooth, which will allow you to layer on more colors later to create a smoother blend. Right now these are just base layers to get the ombré started. By pressing lightly at the stage, you’ll make it easier to smooth out the color transitions later.
Step 21
Next, color the remaining sky segment using Copenhagen Blue 906, remembering to press lightly, especially as you start to gently overlap the layer of light blue near the very bottom of the sky.
When you’re done, notice that you’ve created five “color zones” that we’ll smooth out in the next few steps to create a smoother transition!

Step 22
Now we’ll go back to the top and add some depth to that black! Using a black colored pencil on its own can result in a rather dead and lifeless look, to the point where some artists refuse to use black and instead achieve black by mixing together other colors. In our case, we’ll apply Violet 932 on top of the black to help deepen it, resulting in a richer, more interesting color. Use moderate pressure, because you’ll be going over this area one more time in the next step, so the paper still needs to have some tooth left in it.

Step 23
Now let’s finish up the top of the sky. Use Black 935 to darken the top area even further. Apply firm pressure as needed to create a smooth solid black, as shown below. Use lighter pressure as you near the next color band below (the violet area). Using a light circular motion, gently color over the very top of the violet area with Black 935 to begin the transition from black to violet.

Step 24
Let’s continue the transition using Violet 932. Use moderate to strong pressure as you color on top of the area that is already violet to deepen the violet color and smooth it out. Use Violet 932 to color on top of the area where the black meets the violet, to smooth out the transition. Start working on the next color transition at the bottom of the violet band by pressing lightly with Violet 932 on the very top of the Indigo Blue band.
In the example below, this step has been fully completed on the right side. On the left side, this step has been completed only at the top of the violet section, so that you can see the difference from before and after by comparing the two sides. Note how much of a darker violet the completed section appears compared to the original layer of violet. This is the result of pressing harder: less paper shows through, making the color richer, deeper and smoother.

Step 25
Continue using Violet 932 to finish coloring in the violet section and begin the transition to the Indigo Blue color below.
Step 26
Following the same procedure described in step 24, use Indigo Blue 901 to color over the next area down. When you get to the top of the next color area, press lightly using a small circular motion to create a smooth transition.

Step 27
Moving down to the next color area, use Copenhagen Blue 906 with moderate to hard pressure to deepen the colors. When you get to the top of the next color area (the lightest blue section), press lightly using a small circular motion to create a smooth transition.

Step 28
Use True Blue 903 to color over the next layer, which will deepen the colors.

Step 29
You’re almost done with the sky! Use Non-Photo Blue 919 at the top of this last sky area. Use Sky Blue Light 1086 to finish smoothing out the very bottom of the sky where it meets the grass.

Step 30
Time to work on the moth!
Study the moth below. We’ll start by coloring in the background of the moth’s wings. Use Deco Pink 1014 for the lightest areas, then gently overlap at the edges of the Deco Pink zone with Pink 929 to start the transition to a darker pink tone. Use Process Red 994 to create a darker pink area. To create the darkest areas, use Dahlia Purple 1009 sparingly (for example, in the very top corners of the moth design).
It’s kind of hard to describe coloring this section in words, so please study the example below and closely notice the color transitions.

Step 31
Let’s begin coloring in the details on the moth! Use Canary Yellow 916, Spanish Orange 1003, and Orange 918 to color in some of the details on the moth, as you can see below. Canary Yellow is the “main color” and Spanish Orange and Orange are used to create a subtle sense of shading.

Step 32
Use Light Green 920, Light Aqua 992, and Aquamarine 905 to color more details in the moth. Light Green is the “base color” while Light Aqua and Aquamarine are used to create a subtle sense of shading, as you can see below.

Step 33
Use Lavender 934 and Parma Violet 1008 to color in more details on moth.

Step 34
Finish up the remaining moth details with Canary Yellow 916, Spanish Orange 1003, Orange 918, and Pale Vermilion 921. I’ve listed those colors in order of light to dark, so you can lay down Canary Yellow as a base color and then create a smooth transition using the other colors. Use Pale Vermilion to create the darkest areas.

Step 35
Time to start on the flowers! Let’s start with the flower at the very bottom center.
Use Canary Yellow 916, Spanish Orange 1003, Orange 918, and Pale Vermilion 921 to color in the petals, using the darker colors to create shadows along the bottoms of the petals.
To color in the flower’s center, use Deco Pink 1014 for the rim of light color at the top. Use Pink 929 as the mid-tone color and Process Red 994 for the darkest part.

Step 36
Now we’ll move onto the flower directly above the previous flower!
To color the inside of the flower, use Spanish Orange 1003 for the main color and Pale Vermilion 921 for the shadow.
To color the petals, apply a light layer of Poppy Red 922. Use Raspberry 1030 for the darkest parts of the petals. Use Tuscan Red 937 for the in-between color that transitions from light to dark. After you’ve colored in the petals, you can use White 938 to add a ring of “shine” along the petals, as you can see below.

Step 37
Moving upwards, we’ll now color the flower just above the flower you just colored, right underneath where the mushrooms touch.
Starting with the petals: use Canary Yellow 916 for the lightest part of the petals and Pale Vermilion 921 for the darkest parts of the petals, and Spanish Orange 1003 for the in-between color.
For the center of the flower: use Lavender 934 (the light part of the center) and Parma Violet 1008 (the darkest part of the center).

Step 38
Let’s color in the two large flowers on either side of the very bottom yellow flower. For the petals, lightly use Deco Pink 1014 for the lightest areas and Pink 929 for the mid-tone color, as shown below. To create a “shine” on the petals, leave an empty band of space on each of the petals, as you can see in the example below, which allows the white of the paper to show through.

Step 39
Deepen the colors of the petals using Process Red 994 and Dahlia Purple 1009 for the darkest areas at each end of the petals. You can go over the petals with Deco Pink 1014 to smooth out the transitions.

Step 40
Color the centers of the flowers using Sky Blue Light 1086 for the lightest area, and Non-Photo Blue 919 for the darker areas.

Step 41
Now let’s hop back to the frogs!
We’ll color in the flowers on the frogs using Spanish Orange 1003 and Pale Vermilion 921 for the petals, leaving a blank ring of “white” in between the colors where the white of the paper shows through. Use Pink 929 and Process Red 994 for the centers of the flowers.

Step 42
Next we’ll move on to the flowers that are sprouting just behind the frogs, which we’ll make yellow.
Use Canary Yellow 916 for the lightest yellow parts, then Spanish Orange 1003 and Pale Vermilion 921 for the shadows. For the deepest shadows, use a touch of Crimson Red 924. For the anthers (the little things sprouting from inside the flowers) use Pink 929 and Process Red 994.

Step 43
Let’s move on to the flowers on the very left and right sides, next to the mushrooms. To make it easier for you to see which flowers we’re working on, I’ve desaturated the rest of the image below.
To color the petals, use Deco Pink 1014 for the lightest area, Pink 929 for the mid-tone and Process Red 994 for the darkest shadows.
To color the inside of the flowers, use Poppy Red 922 for the lightest color, Raspberry 1030 for the mid-tone, and a touch of Tuscan Red 937 for the darkest shadows.

Step 44
Let’s move down a little and color in the flowers below the previous ones, on the far left and right sides. We’ll make these flowers red with yellow centers.
To color in the petals, use Poppy Red 922, Raspberry 1030, and Tuscan Red 937. Leave a blank band along the center of each petal so that the white of the paper shows through, to help create a shine. Go over the shine with White 938 to smooth the transition from the white shine to the red of the petals.
Color in the flowers’ centers using Canary Yellow 916, Spanish Orange 1003 and Pale Vermilion 921.

Step 45
Moving on to the small mushrooms that are scattered around the base of the large mushrooms, we’ll use Deco Pink 1014 at the tops and along the stalks. Use Lavender 934 for the mid-tone color and Parma Violet 1008 for the darkest color. Use Lavender 934 to draw subtle lines that connect to the black lines of the illustration.

Step 46
Time to color in more flowers! We’ll focus on the flowers that are either side of the center red flower, just underneath the main mushrooms.
In order from light to dark, use Spanish Orange 1003, Orange 918 and Pumpkin Orange 1032 for the flower petals. For the centers of the flowers, use Canary Yellow 916 for the main color, and a touch of Spring Green 913 for a slight shadow.

Step 47
For the next set of flowers, use Canary Yellow 916, Spanish Orange 1003, and Pale Vermilion 921 on the flower petals. Use Pink 929 and Process Red 994 for the flowers’ centers.

Step 48
For the next set of flowers, use Deco Pink 1014, Pink 929 and Process Red 994 for the petals. For the centers, use Canary Yellow 916 and a touch of Pale Vermilion 921 for the slight shadows.

Step 49
Now we’ll color two more small flowers, shown below. For the petals, use Canary Yellow 916, Spanish Orange 1003 and Orange 918. For the centers, use Process Red 994.

Step 50
Time to fill in all the remaining flowers and pebbles nestled in the grass!
Use bright happy colors such as 938 White, 916 Canary Yellow, 918 Orange, 1003 Spanish Orange, 1014 Deco Pink, 994 Process Red, 922 Poppy Red, 934 Lavender, 1008 Parma Violet, 1086 Sky Blue Light, and 992 Light Aqua.

Step 51
Now let’s color in the flowers, circles and butterflies in the sky!
Starting with the flowers at either bottom side of the moth, use 1086 Sky Blue Light, 905 Aquamarine, 919 Non-Photo Blue for the petals on top. Use 934 Lavender and 1008 Parma Violet on the bottom petals, and a touch of 922 Poppy Red for the centers of the flowers.

Step 52
For the flowers right next to the moth’s antennae, use 929 Pink and 994 Process Red on the petals and 905 Aquamarine for the centers.

Step 53
For the flowers next to the tips of the moth’s wingspan, use 1086 Sky Blue Light and 905 Aquamarine on the petals, 994 Process Red inside the flowers.

Step 54
Moving down the edges to the next flowers, use 1014 Deco Pink, 934 Lavender, 922 Poppy Red for the petals. Use 992 Light Aqua for the centers. Instead of coloring in the centers fully with Light Aqua, you can color around the edge of the circles, leaving the white of the paper to show through in the very centers, creating a highlight.

Step 55
For the small butterflies, use 916 Canary Yellow, 918 Orange and 1032 Pumpkin Orange.

Step 56
You’re almost done, can you believe it?!
Woohoo!! 😍
Use various colors to fill in the remaining circles and flowers, such as: 916 Canary Yellow, 918 Orange, 1003 Spanish Orange, 921 Pale Vermilion, 1014 Deco Pink, 929 Pink, 994 Process Red, 934 Lavender, 1086 Sky Blue Light, and 913 Spring Green.
✨ CONGRATULATIONS!! ✨
You’ve just completed coloring in this intricate illustration. You should feel very proud of yourself for what you’ve accomplished!! 🌟
I hope you’ve enjoyed this free step-by-step colored pencil lesson, and learned a lot along the way, too!
If you like my whimsical frog illustration, check out my other coloring books and printables.
Keep learning…
To learn more about colored pencils, visit my detailed Guide to Colored Pencils.
You can also check out my other coloring tutorials, drawing lessons and painting lessons.
If you enjoy my coloring pages, you can join my coloring group to share your colored pages from my books and printables, and see how other people have colored them in!
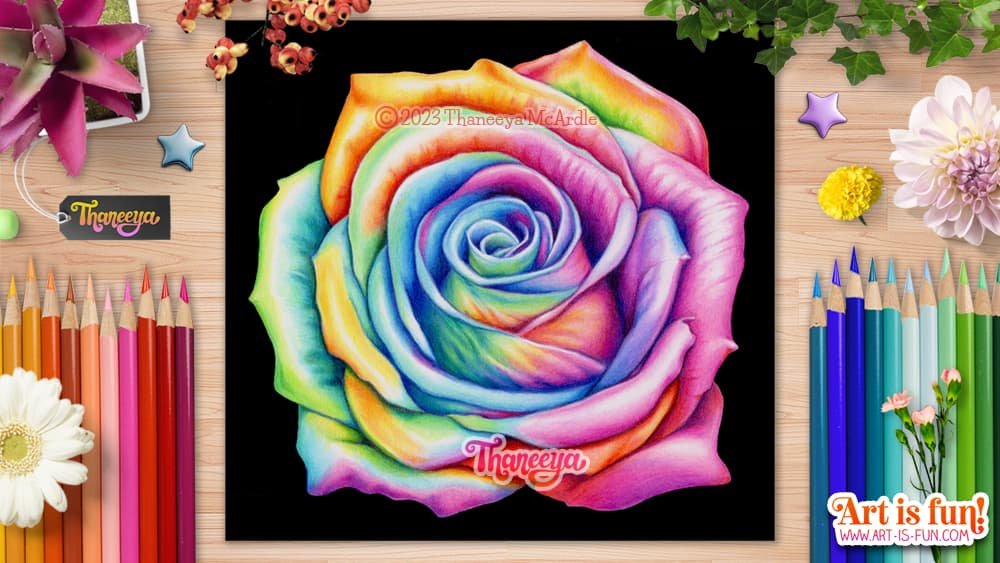
Learn the best colored pencil blending techniques for creating vibrant realism, like this rainbow rose! 😍
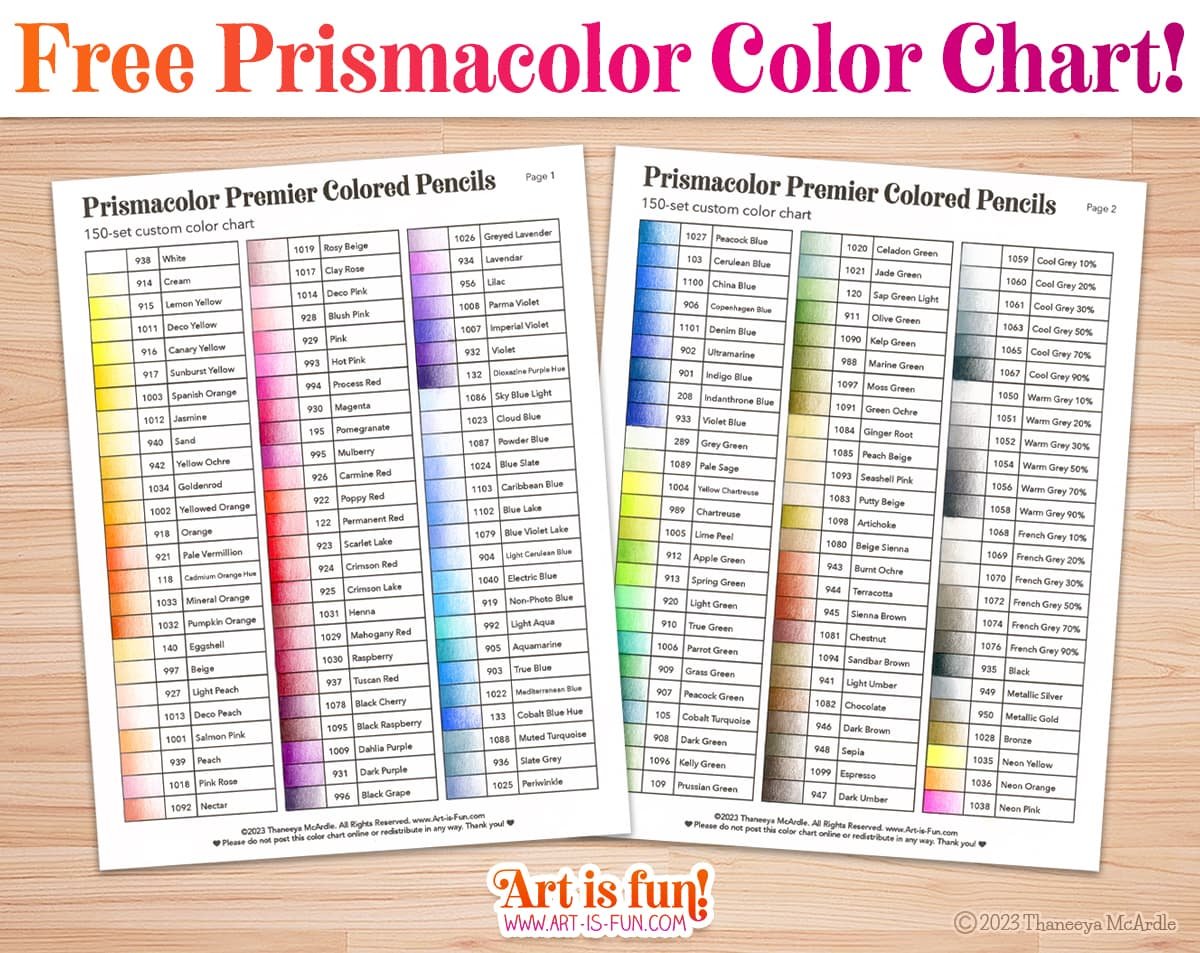
If you have Prismacolor’s big set of 150 colored pencils, then you’ll definitely want to keep your colors organized! Download and print my free blank Prismacolor Color Chart so that you can see all of the colors at a glance!
Level-up Your Colored Pencil Skills!
Make the most of your new colored pencils with these easy-to-follow video lessons from Skillshare! Get instant access with a 14-day free trial or use our code, ARTISFUN30, to get 30% off annual membership! As a Skillshare affiliate I get a small commission that helps support this site.