How to Draw a Rose
Learn how to draw a rose! This drawing lesson will walk you step by step through the drawing techniques you will need to create your own rose pencil drawings.
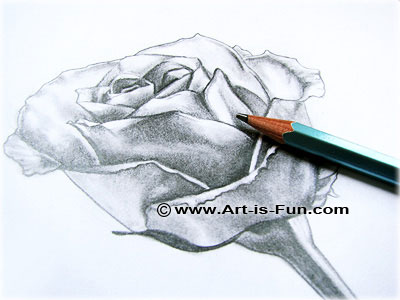
In this lesson, I'll show you how I made the rose drawing above.
To create this flower drawing, I used ordinary materials that you will find around your house. I didn't want to use any fancy art materials, because I wanted to create a drawing tutorial that absolutely anyone can try - you can try it right now, if you want!
Let's get started!
If you make a purchase via the links below I receive a small commission, which helps support this site.
Drawing supplies for how to draw a rose:
- a regular HB pencil (HB stands for the hardness of the lead. Most pencils sold in stores for general writing purposes are HB.)
- a kneaded rubber, which is a type of artist's eraser - but you can use any type of eraser
- a pencil sharpener
- a Q-tip (also known as a cotton bud)
- white paper (but you can use any color paper you want!)
- a photo of a rose (you can also look at a real rose if you want)


Here is the beautiful rose photo that I used as a reference for this drawing. This lovely rose photo was taken by Tambako and is used here with his permission for teaching you how to draw a rose!
One of the best things about learning how to draw a rose is that you don't need to worry about getting everything in exact proportion. If you draw a petal too large or too small, who's gonna know? So don't worry about drawing everything to perfectly match the photo. Just relax and enjoy the drawing process!
If perchance you do want to get the drawing absolutely perfect, you can use image transfer techniques such as transfer paper, the grid method, or use an art projector if you want to make a really big drawing.
Start Drawing in the Center
I find that it's easiest the way to get started with a rose drawing is to identify the center of the rose. Find the innermost petal, and start your drawing there. Be sure to start drawing in the center of your paper, because you will be working outwards.
Make sure that you start out small when you draw the inner petals, so that by the time you draw the outer petals, they're not falling off the page!
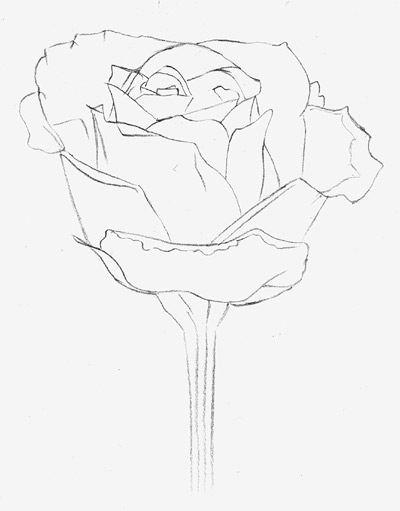
Here's an example of what you should look for in terms of identifying the center of the rose:

The arrows point to the innermost petal, which is where I started my drawing.
Draw one petal at a time, checking where they are in relation to one another. Don't worry about adding shadows at this point. The main thing is to draw a light pencil outline of the entire flower.
Be sure to use a light touch, because that makes it easier to erase if you need to make changes.
You will draw something like this:
Once you've drawn the entire outline of the rose, you are ready to start shading. Again, I find it easier to keep track of "where I'm at" in the drawing if I start with the innermost petal and work my way outwards.
There are two ways you can go about shading:
Dark to light: Identify the areas that are darkest, and shade them in first, gradually working towards the lighter sections.
Light to dark: Start with the light areas, and shade them in gently. Gradually increase your pencil pressure as you move towards the darker areas.
For this drawing, I used the first method - starting with the dark areas. You can use whichever method works best for you!
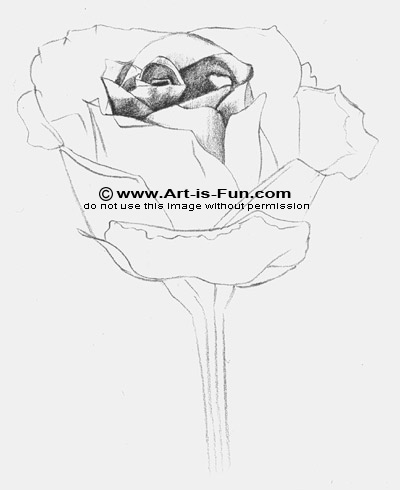
Continue with the shading, working your way around the flower. I worked in a spiral motion, circling outwards from the center.

Once you've shaded an entire area, you can rub the graphite with your Q-tip. This will blend the graphite, softening the pencil markings, making the surface look smooth. This is a great technique to use for flowers to achieve that soft, delicate feeling.
Check out the picture below to see what I mean!
You can use Q-tips as a good DIY solution to blending. If you want to get serious about drawing, you can buy something called a stump (right) or a tortillon (below) from an art supply shop.
Stumps and tortillons are basically made from a sheet of tightly rolled paper that is soft and sharpened to a point at one end. Because of this point, they allow for more precision and control for blending than a Q-tip does.
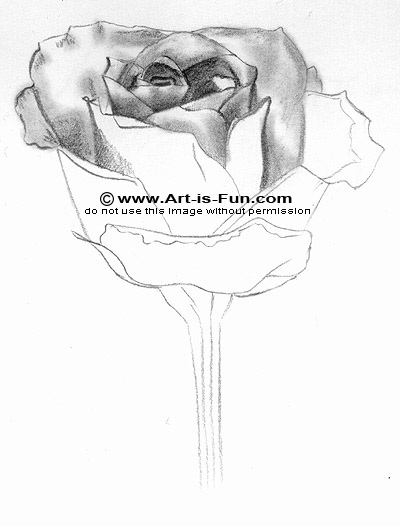
Continue adding shadows and softening them with the Q-tip. You can also use your eraser to lift some of the graphite off of the paper, which will lighten the areas that you may have overdarkened.
In the picture below, you can see how some of the areas are smoothly blended with a Q-tip, while other areas have quick pencil shading. This shows you how the drawing starts off as a building process of laying down graphite.
After you run the Q-tip over an area, you will find that some of the darker spots will have been lightened, because the graphite was lifted off on the Q-tip.
To make those areas dark again, just go back and make some dark pencil marks there.

Carry on in this manner until the drawing is finished!
Tip: When you are shading, it doesn't matter if the tip of the pencil has gone dull. In fact, when you are shading it is better to use a pencil that is dull rather than sharp, because this makes for easier coverage.
To recap, there are 4 main techniques at work to create this rose drawing:
- Sketching the outline of the rose
- Building and layering - adding shadows
- Smoothing and blending with a Q-tip
- Lifting off any areas that are too dark with an eraser
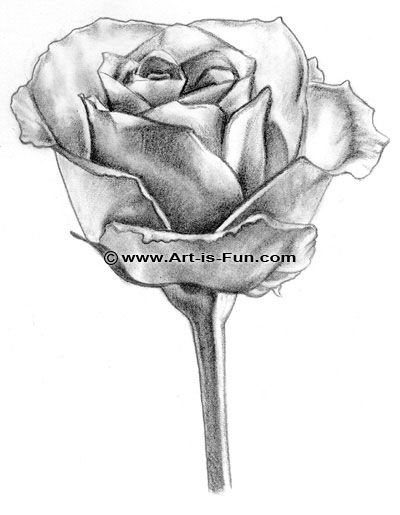
Voila! The finished rose drawing!
Please note that your rose pencil drawing can get easily smudged at this point, so try to keep it in a protected place. If you'd like to keep it for awhile, spray it with a final sealant. This will prevent smudging and fading. It will also protect the drawing from UV rays and moisture. The sealant that I use for my drawings is called Krylon Crystal Clear (this links to Blick Art Materials, and if you make a purchase I get a small commission that helps support this site).
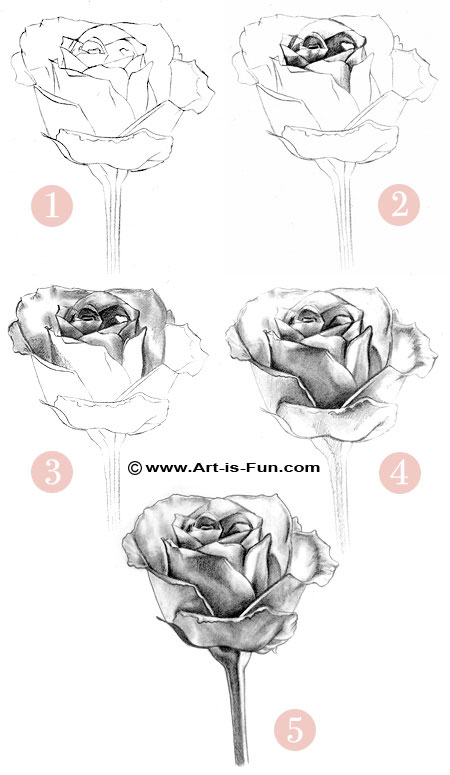
Here is a quick re-cap of all the steps on how to draw a rose:

Want more drawing lessons? Click here to return to the main Drawing Lessons page, where you will find all kinds of fun drawing tutorials!
Let’s Draw Course
If you’d like to learn the fundamentals of drawing, so that you can draw whatever you want, check out my review of the Let’s Draw Course!
This video and ebook-based course allows you to learn from two experienced instructors from the comfort of your own home and at your own pace!


