How to make your own soft pastels from scratch
This demo shows you how to make your own soft pastels from scratch by mixing pigments with a binder and water. The process is easier than you might think!
What are some reasons you might want to make your own soft pastels? The main advantage of making your own pastels is that you can control the colors and the consistency of the pastels - so you can practically design pastels that are just to your liking. Also, if you tend to use a lot of a particular color, you can make a bunch of pastels in that color, as well as tints and shades. Plus, it's just cool to discover how they are made!
I'm not an expert in making pastels - I've only done it a few times - but since the process is so easy and satisfying I felt it was worth sharing! I even have a few pastels in my collection that I created a whopping 11 years ago and they’re still in the same great condition as they were when I first created them!
It’s worth noting that there are lots of different pastel recipes floating around, depending on whether you want to add filler or preservatives, for example. The recipe I followed is fairly simple and doesn't require too many ingredients.
When making pastels, remember to work in a well-ventilated area (I made mine outdoors). Pastel particles can be dangerous if inhaled, so it's advisable to wear a face mask and use a hand barrier cream and/or latex gloves. Remember not to eat or drink while working with any of these materials.
If you make a purchase via the links below, I receive a small commission (at no cost to you) that helps support this site and keep it free of ads!
Materials
- Powdered pigments
- at least 1 pigment to start with, more if you want to make more colors
- Gum tragacanth
- You can use other binders to make pastels, but gum tragacanth is the most common.
- Glass jar
- Water
- I used tap water, though some recipes advise using distilled water for purity
- Glass Palette
- Palette Knife
- Paper Towel
- Pastel paper to test your finished pastel(s)
Process
In this recipe, gum tragacanth will serve as the binder that holds the pigment together. It is most commonly bought in powdered form, and we need to mix it with water to create the gel that we’ll mix with our pigments. In your glass jar, place 1 part gum tragacanth to 30 parts water. Mix them together until the gum tragacanth is fully dissolved, and then refrigerate the jar for 48 hours. To help the gum dissolve, you can heat the solution before putting it in the jar, but don’t boil it. (I didn’t heat my mixture and it turned out fine, but then again I live in a warm climate so maybe it wasn’t necessary.)
After the gum tragacanth solution is ready, place a pile of pigment onto your glass palette. Make a hole in the middle of the pigment pile, as shown below.

Spoon out a small amount of the gum tragacanth mixture and place it in the hole in the middle of the pigment, as shown below. Note that the gum tragacanth mixture looks like a gooey blob - it’s not too runny but not too solid either.

Use your palette knife to thoroughly mix together the pigment and the gum tragacanth solution. Your goal is to achieve a doughy consistency. If you need to, you can add more gum tragacanth solution or more pigment until this doughy consistency is achieved.


Use your palette knife and your fingers to mold the doughy mixture into a pastel shape. Place the pastel onto a paper towel and let it dry, which will usually take between 24-48 hours. Don’t try to speed up this process because it could result in a pastel that crumbles more easily.

It might not be the prettiest-looking pastel, but it'll do! 😆

Here's a quick mark I made after the pastel dried. The pastel makes a nice mark, and because there’s a high concentration of pigment and no filler, the color is wonderfully strong.

Tips
Each pigment is different and may need more or less binder (gum) to produce an ideal pastel. If the result is too fragile and brittle (making crumbles instead of smooth strokes), the recipe needs more gum tragacanth. Alternatively, if the pastel is too hard for your tastes, less gum is needed. In a nutshell, more gum makes the pastel harder and less gum makes the pastel softer, and the ideal amount of gum may depend on the specific pigment you are using.
You can add or subtract gum tragacanth in two ways:

Gum tragacanth ready to be mixed with water
You can add more or less of the gum gel mixture to create a different consistency of the pigment/gel dough.
You can experiment with the gum tragacanth mixture itself by adjusting the ratio of gum to water (thereby creating different strengths). Note: this has to be done when first making the gum tragacanth (you can’t add it after the gel has already formed), so it’s best to make up several different batches from the outset. The ratio of gum to water I used was 1:30, but you can experiment with different ratios to see how they perform with different pigments.
As you can see, there aren’t any precise recipes when it comes to making your own pastels. You need to experiment with different pigments and different gum tragacanth mixtures. It helps to be precise in your measurements (how much you used of each ingredient), so that when you discover a recipe that works really well with a particular pigment, you can replicate it perfectly each time.
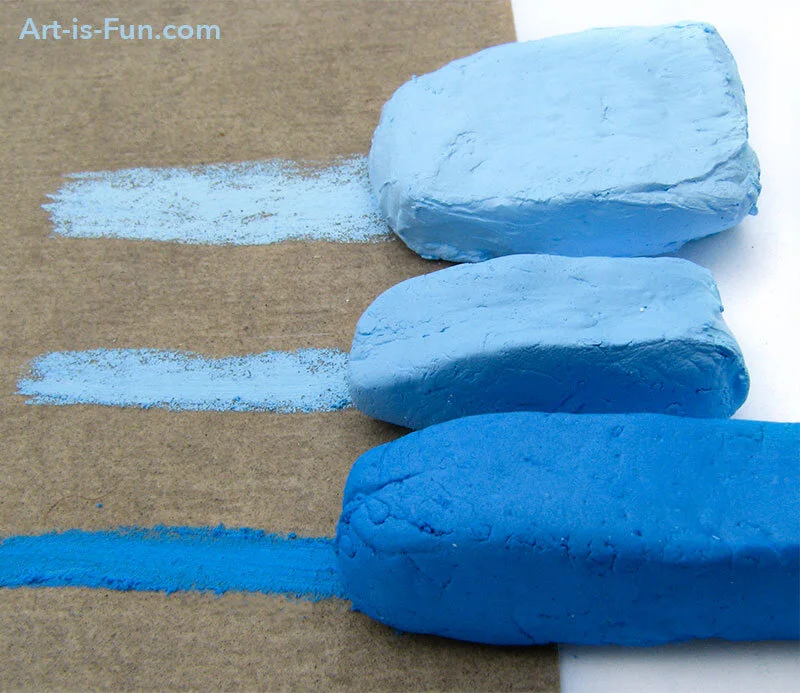
Making tints and shades
It’s also a good idea to portion off some of your pigment/binder mixture and add other pigments to create shades and tints. In the example below I combined blue and white pigment to create a light blue tint.


Thanks for reading and I hope this was helpful! If you enjoy using pastels, making your own pastels can be both a fun and educational experience. The process can open your eyes to how simple pastels are really - they just consist of pigment, binder and water! Cheaper store-bought pastels contain filler which lessens the quality of the pastel, so if you’re making your own pastels, you can make them top-notch by omitting the unnecessary filler!
If you’d like to get serious about making pastels and require further information, I recommend this detailed guide: How to Make Soft Pastels by Hand.


