How to paint glass objects photorealistically
Wanna learn how to paint glass objects in a photorealistic manner?
Glass objects (like jars, drinking glasses, eyeglasses, tumblers etc) are amongst the most challenging things to paint in a photorealistic manner, because you need to capture both the solidity of the object, as well as the transparency of the object.
How can you accomplish this?
I'll tell you how!
I've painted glass objects in my photorealism paintings several times, both in my watercolor paintings and my acrylic paintings.
I'll tell you how I managed to create that delicate balance between solidity and transparency to make those glass objects appear true to life!
Tips on how to paint glass objects:
Here is a trick that you may be surprised to learn about how to paint glass objects:
Most of the time, you don't need to worry about painting the glass itself.
What does this mean?
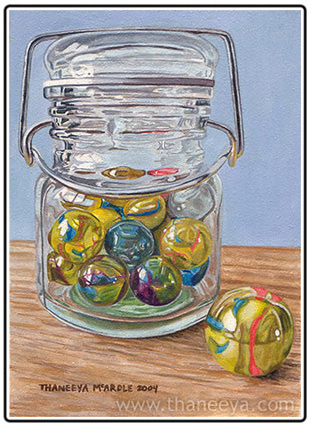
Well, you know how glass distorts objects that are placed inside of it, like in the jar of marbles above?
Instead of worrying about painting the glass, focus your attention on painting the distorted shapes of the marbles (or whatever object you have inside of your glass).
Don't even "think" at all - just paint what you see.
Encourage right-brain thinking!
Often, our logical left brain takes over and tries to dictate what we "should" be painting and how it "should" look.
Therefore the main trick to learning how to paint glass objects photorealistically is to activate your right brain by getting rid of those "shoulds" and instead, paint what you actually see.
So don't even think about the fact that you are painting a glass object. Just focus on color, shape, and form.
If the glass is empty, focus on each specific color, paying close attention to each color shift. Start with the obvious, noticeable colors and then use the glazing process to smoothly blend everything together.
In summary, this is the real key to how to paint glass objects photorealistically:
Be sure to paint what you actually see, and not what you think you see. Part of what makes painting glass photorealistically so tricky is that the brain often tries to dictate what the painting should look like, and that interferes with the visual information that is actually there.
Pay attention to subtle colors
Once you've started focusing on what you actually see, you are now released from the "idea" that you are painting something that should look a certain way. Now you can focus on the actual painting process.

Colors are very important when attempting to capture the look of glass in paint.
Obviously, whites and blacks will be very important when painting glass, as well as various shades of grey.
I have personally never used grey paint, so although it is readily available, I don't really think it is necessary. You can mix any shade of grey that you need easily by using plain old white and black.
Additionally, look closely at the colors that are actually there - are there tints or shades of blue, purple, brown, green, etc...? For instance, in my painting "Posse" that you see above, there are 3 different types of glass objects, and each has its own distinct coloring.
The left one is a cool, bluish grey... the middle one is an umber sort of grey... and the right one is a sea-greenish grey.
Take a close look at the colors of the glass, and be sure to incorporate them into your painting using the glazing process.
Creating acrylic glazes
What is this "glazing process" that I keep mentioning? And why is it so important in learning how to paint glass objects?

Glazing with acrylics has to do with creating very thin layers of paint - either watered down or diluted with medium such as Acrylic Glazing Liquid (this links to Blick Art Materials, and if you make a purchase, I get a small commission, at no extra cost to you).
The glazing process is really important when painting photorealistic glass objects. This is what enables you to capture those subtle shades and hues that you see in the reflections. If you want to paint glass objects in a photorealist style, definitely check out my page about creating acrylic glazes!

Want to learn how to paint your own photorealist paintings?
Check out my in-depth guide:
How to Paint Photorealism: A Step-by-Step Guide on How to Paint Your Own Photorealistic Paintings - a FREE 15-page guide explaining the materials and methods to working in Photorealism.
The books below are available on Amazon. As an Amazon Associate I earn from qualifying purchases.
Juxtapoz Hyperreal
Colored Pencil Painting Bible
Photorealism: 50 Years of Hyperrealistic Painting


