Acrylic Texture Medium Tutorial

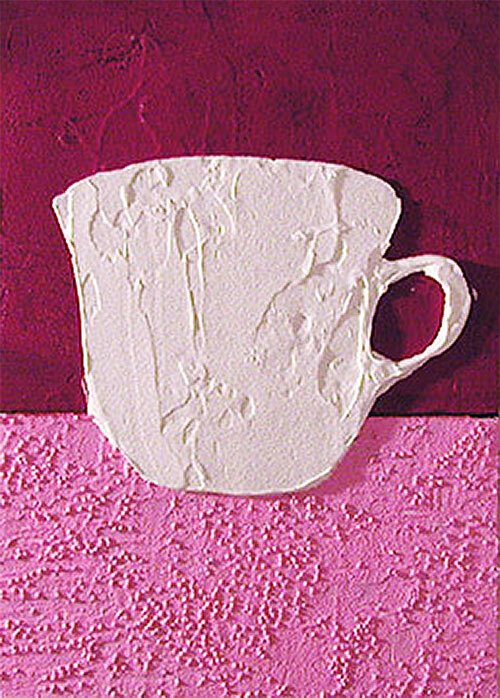
In this acrylic texture medium tutorial I'll show you how I made the tea cup painting shown above! This is an easy intro lesson that demonstrates how to use various acrylic texture mediums and a masking technique to create a whimsical textured painting of a tea cup.
Supplies
If you make a purchase via the links below, I get a small commission (at no extra cost to you) that helps support this site. Thanks in advance!
- Wood panel - 5 inches by 7 inches x .5 inch
- Acrylic paint (I use Liquitex and Golden)
- Gold metallic acrylic paint
- Liquitex Acrylic Texture Glass Bead Gel Medium
- Liquitex Acrylic Texture Ceramic Stucco Texture Gel
- Liquitex Light Modeling Paste
- Paintbrushes
- Palette
- Palette Knife
- Painter's Tape for delicate surfaces
- X-Acto Knife
Step 1: Background Painting
The first step is to paint the background.

For the top half of the painting, I mixed acrylic paint with Liquitex Light Modeling Paste and Ceramic Stucco Texture Gel. The paint colors I used were Alizarin Crimson and a touch of Cadmium Red Medium.
Using a palette knife, I mixed the color with the texture gels on my palette until they were thoroughly intermixed. Then I used my palette knife to apply the mixture to the top half of the painting.
As you can see by comparing this step to the finished version, I ended up changing this top color to gold. Just shows you never know what to expect when you make art because you might change your mind at any point along the way - probably several times!
For the bottom half of the painting, I mixed acrylic paint (Quinacridone Red and Titanium White) with Liquitex Light Modeling Paste and Glass Bead Texture Gel. Glass Bead Gel is cool because, as its name suggests, it consists of tiny round beads. Everything was mixed together on my palette with a palette knife, and then applied to the painting with the palette knife as well.
I then set aside the painting to dry.
Step 2: Creating a Mask

After the painting was complete dry, I covered the central area of the painting with several rows of painter's tape. I'd definitely recommend using tape that is labelled as a "Painter's Tape" rather than regular Scotch tape, because painter's tape is designed to easily peel off without leaving behind any residue.
Using a pencil, I drew the outline of a tea cup on top of the painter's tape. For a reference I used a tea cup that I've had since I was a child, so it has sentimental value.
Next I used an X-Acto knife to carefully cut the outline into the tape. It might sound scary to cut into tape that's right on top of a painting, but if you're careful you can get a pretty good sense of how deep to cut so that you don't cut into the canvas.
After cutting the outline of the tea cup, I lifted off the taped areas inside the tea cup, so the surface of the painting was showing through (as you can see on the right).
This technique is called "masking" because it protects certain areas from getting painted on (the blue area). The blue area is called a "mask".
Step 3: Painting Over the Mask
Next I used my palette knife to apply Liquitex Light Modeling Paste over the blue taped area (mask), completely covering the outline of the tea cup. I was careful not to get any modeling paste on the unprotected areas above and below the mask.
I applied enough modeling paste to create a raised look, as I wanted to create a slight 3-D effect. As you can see in the photo below, the tea cup is raised enough to cast a shadow.
I didn't mix the modeling paste with any color because I wanted the tea cup to be white, and the modeling paste is already white, and dries to an opaque white.
I let the modeling paste dry a bit, then I carefully removed the mask. It might be a good idea to wait until the paste is completely dry or else you risk messing up the paste, but I was impatient and wanted to see how it looked, so after the paste had some time to set I carefully removed the tape to reveal the tea cup as you see in these two pics.

Step 4: Paint!

After the modeling paste was completely dry, I painted a design on it. The design is based on a real tea cup that I've had since I was a kid. I like the delicacy of the design as contrasted with the uneven texture of the tea cup, as created by the modeling paste. To accentuate the 3-D effect, I painted a shadow to indicate the inside of the tea cup, as well as a slight shadow near the bottom of the tea cup.
I started painting flowers and circles in the background, but it really wasn't working for me.
After playing around with some ideas, I ended up painting a diamond pattern for the table in 2 shades of pink. I covered the upper background with a metallic gold paint by Golden. It took a couple of coats to make the sheen really strong and solid. After that layer dried, I painted an array of pink dots over the gold, using the same colors as the diamond pattern below.
Here is the finished painting again:

I hope you enjoyed this tea cup acrylic painting tutorial! It was a lot of fun to make, and most of all it was fun to experiment. As you can see I ended up changing some things along the way, which is an example of how important it is to be flexible and open to the creative process.
Happy Painting! 😃
Learn more about painting with acrylics
Back to the main Painting with Acrylics page


