Royal Icing for Sugar Skulls
Make royal icing for sugar skulls with these step-by-step instructions!
Royal icing has two main applications for sugar skulls: decoration and glue.

Our main focus in this article will be preparing royal icing for decoration, to be mixed with food coloring so it can be used to decorate sugar skulls with vibrant, colorful designs.
You can also use royal icing to glue the front and back skull parts together to form a complete a sugar skull. This process is shown on our How to Make Sugar Skulls page.
Royal icing is well-suited to sugar skulls because it dries really hard (no refrigeration necessary) and it lasts a long time.
Visit some of our other pages to learn how to make medium/large skulls and life-size skulls.
To see how to use royal icing on sugar skulls check out our How to Decorate Sugar Skulls page.
Ingredients

2 pounds of Powdered/Icing Sugar
1/2 cup Meringue Powder
2/3 cup Water
Concentrated Icing Color
This will make plenty for decorating, depending on how many colors you're using and how many skulls you're decorating.
If you're making royal icing in order to glue your skulls together, halve the above recipe and you'll still have plenty.
Note: this recipe contains more than double the meringue powder you would need if you were making royal icing for edible items like cookies and cakes. Because sugar skulls get handled a lot and we want them to last a long time, we need our royal icing to be super strong.
Please note that even though sugar skulls are made of edible ingredients, they are not meant to be eaten.
Substitutions
This recipe contains meringue powder because you also need it to make the sugar skulls. However, meringue powder can be expensive and it is not essential for making royal icing. If you want to save some money you can substitute with egg whites. The icing won't be as long-lasting, but it will do the job just fine. This variation requires the following ingredients: 3 egg whites, 4 cups powdered sugar, and 1/2 tsp cream of tartar. Follow the same instructions below.
Mixing the Ingredients

Mix all the ingredients together in a large bowl. Using an electric mixer will be much easier and quicker, but with some extra effort and energy you can do it by hand with a spatula.
Mix for 5-10 min until the icing is peaking. It's important for it to be thick because you don't want it flattening out on the skull and distorting your decorations. Thickness is also important if you're going to be using the icing to glue your sugar skull parts together.
Adding the Icing Color
For vibrant colors you need concentrated icing color (usually a paste), which is typically used in cake decorating. I advise against buying liquid food coloring from the supermarket because it will be too weak.
The products below are available on Amazon. As an Amazon Associate I earn from qualifying purchases.

I use Wilton icing colors and find them to be vibrant and long lasting. You can decorate a sugar skull with as few as 6 colors because concentrated paste colors can be mixed together to create new colors. However, for convenience and superior vibrancy I recommend paying a little bit extra for a 12 color set, which should last you a long time.
Divide the royal icing into separate bowls or containers according to how many colors you're going to use. White bowls work best because it makes it easier to evaluate the color.
When using concentrated icing color, a little goes a long way. I typically use a toothpick to transfer a small amount of icing color into the royal icing, which I then mix using a spoon or a knife. For some colors that's all you need. If you want a stronger or darker color, add more icing color little by little until you're happy. I mixed up 11 colors (using the 12 color set without the brown) and this is how the colors turned out.

Preparing your Pastry/Piping Bags
Pastry bags (aka piping bags or decorating bags) of some kind are needed in order to apply the colored icing to the skull with precision. You can buy resuable or disposable pastry bags or make your own with plastic kitchen bags or wax paper.
The products below are available on Amazon. As an Amazon Associate I earn from qualifying purchases.
I prefer to use disposable pastry bags because they're hassle-free (no cleaning) and I can set up 12 colors at the same time without having to worry about running out of bags.
The proper way to use pastry bags is with different shaped tips which connect to the bags via a coupler. Tips are great if you want to make extra fine lines or interesting shapes. They're not terribly expensive, but if you're on a budget you can do without them.
I have a few tips that I use for fine details, but I mostly use pastry bags without tips. I just cut off the bottom of the pastry bag to reveal a small hole and that performs well. Unless you have experience with cake decorating or intend to create very intricate designs, you can get away with using pastry bags on their own.
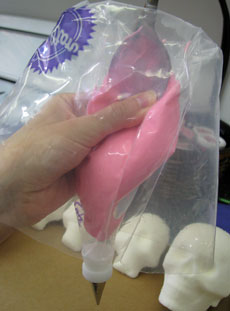
Pastry bags are easy to use, but there are a few techniques that will help you avoid making a mess. Before filling your pastry bag with icing, make a large cuff (using up to half the length of the bag) and grip the bag under the cuff (see image on left). By “cuff” I basically mean you’re folding the open top part of the bag over on top of itself to allow easier access to the bottom, narrow part of the bag. This technique allows you to keep the opening wide and to use your hand to squeeze the icing off the spoon. It also saves a lot of mess because the cuff stays clean. Unfold the cuff and squeeze the icing down towards the tip, then twist the top just above the icing and tie off with a rubber band.
You can make your own pastry bags
If you'd like to avoid buying pastry bags you can always make your own.

It's quite easy to use a zip-lock freezer bag or sandwich bag as a pastry bag. Push one corner into the bottom of a large cup and make a cuff by folding the top part of the bag over the sides of the cup, which makes it easier to spoon in the icing.
Once you've spooned in the icing without making a mess, lift the bag out of the cup and squeeze the icing down into the corner. Slice off the tip of the bag with a pair of scissors, twist and tie-off the top, and you're done (see left). This won't be as precise and easy to wield as a pastry bag, but if you're on a budget it'll work fine.
You can also make pastry bags from scratch using grease-proof paper like wax paper. I've never done this myself, but you can have a look at the this helpful video for a tutorial. The video also covers the different types of pastry bags and demonstrates how to use them.
Here are the bags I last used to decorate sugar skulls. You can see pastry bags with tips on the left and a homemade bag on the right.

You're now ready to start decorating your sugar skulls. You can also use other decorative items like foil, feathers, and beads to add extra pizazz to your sugar skulls. To learn more, visit our How to Decorate Sugar Skulls page.
Here's a taste of what's possible with some colored icing and basic decorations:


