How to Draw Realism with Colored Pencils
Discover the best techniques for drawing realism with colored pencils!
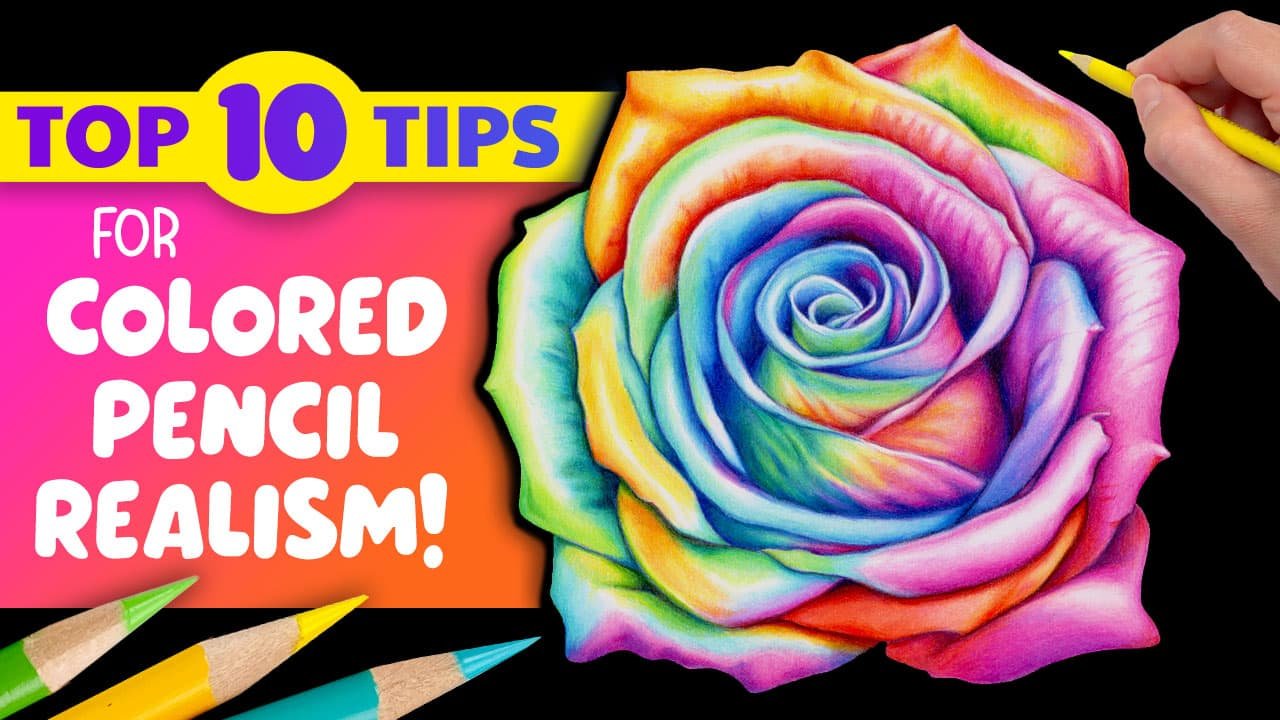
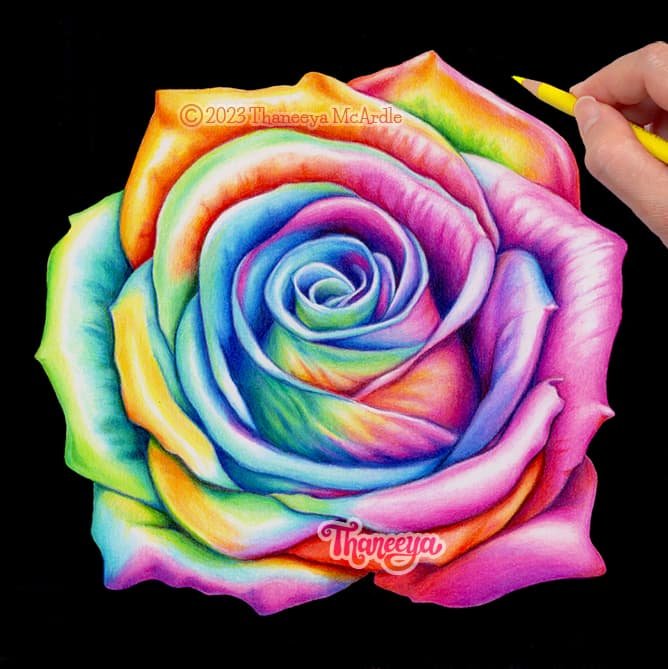
If you want your colored pencil art to look vibrant and realistic, just like this rainbow rose, then come along as I share with you the process of creating this eye-catching artwork! 😍

Supplies Used
For this rainbow rose drawing, I’ll be using Prismacolor Premier Colored Pencils on Strathmore 300 Smooth Bristol Paper. (These are affiliate links, so if you make a purchase after clicking through, I may receive a small commission at no extra cost to you!) 😊
Colored Pencils
I’ve been using Prismacolor Premier Colored Pencils since the 1990s, and I really like them because the colors are quite vibrant. They also have a relatively creamy consistency which makes them easy to layer, blend and burnish (compared to harder colored pencils).
If you want to create realistic colored pencil drawings that are really vibrant like my rainbow rose, then it’s important to note that you’ll get way better results if you use artist-quality colored pencils (like Prismacolor) rather than student-quality colored pencils (like Crayola).
Artist-quality colored pencils have more pigment and less filler (additives and bonding agents), while the reverse is true for student-quality colored pencils (which contain more filler and less pigment). Check out my free in-depth Guide to Colored Pencils if you want to learn more! You can also download my free Prismacolor color chart!
Paper

Strathmore 300 Smooth Bristol is one of my favorite drawing papers to use with colored pencils. I love the smooth texture, although some artists do find it to be too smooth. It all depends on your personal style. But since I layer with a very light hand (as you can see in my video), I can easily layer on about a dozen colors in the same spot before the colors start to naturally burnish.
When I create realistic art with colored pencils, my goal is to cover the entire paper with color, so that the color of the paper is no longer visible. I want the final artwork to look as smooth as possible, almost like a painting. This look is much easier to achieve with a smoother paper like this Strathmore Smooth Bristol.
If you want to create realistic colored pencil art on a more textured, toothier paper, then it can help to blend your colored pencils using a solvent to create that smooth, seamless look. Alternatively, you could create an underpainting using alcohol markers or watercolors. But since I used a smooth paper for this realistic rainbow rose drawing, I won’t be covering the use of solvents or underpainting in this particular lesson.
Watch my drawing process!
If you want to watch me create this colorful rainbow rose drawing from start to finish, check out my YouTube video, where I share even more of my favorite tips for creating eye-catching art with colored pencils! 😍
Click below to watch my colored pencil video:
If you enjoy my video, be sure to subscribe to my channel so you can stay up-to-date on all my latest art tips, techniques and tutorials! 🎨
Colored Pencil Realism Tips
On this page I’ve included some extra tips that I didn’t have time to include in my video above, and in the video, there are some tips that I haven’t included here. So be sure to check out the video and peruse this page if you want to learn ALL my favorite tips for how to draw realism with colored pencils! 😃
Tip #1 - Create an accurate line drawing
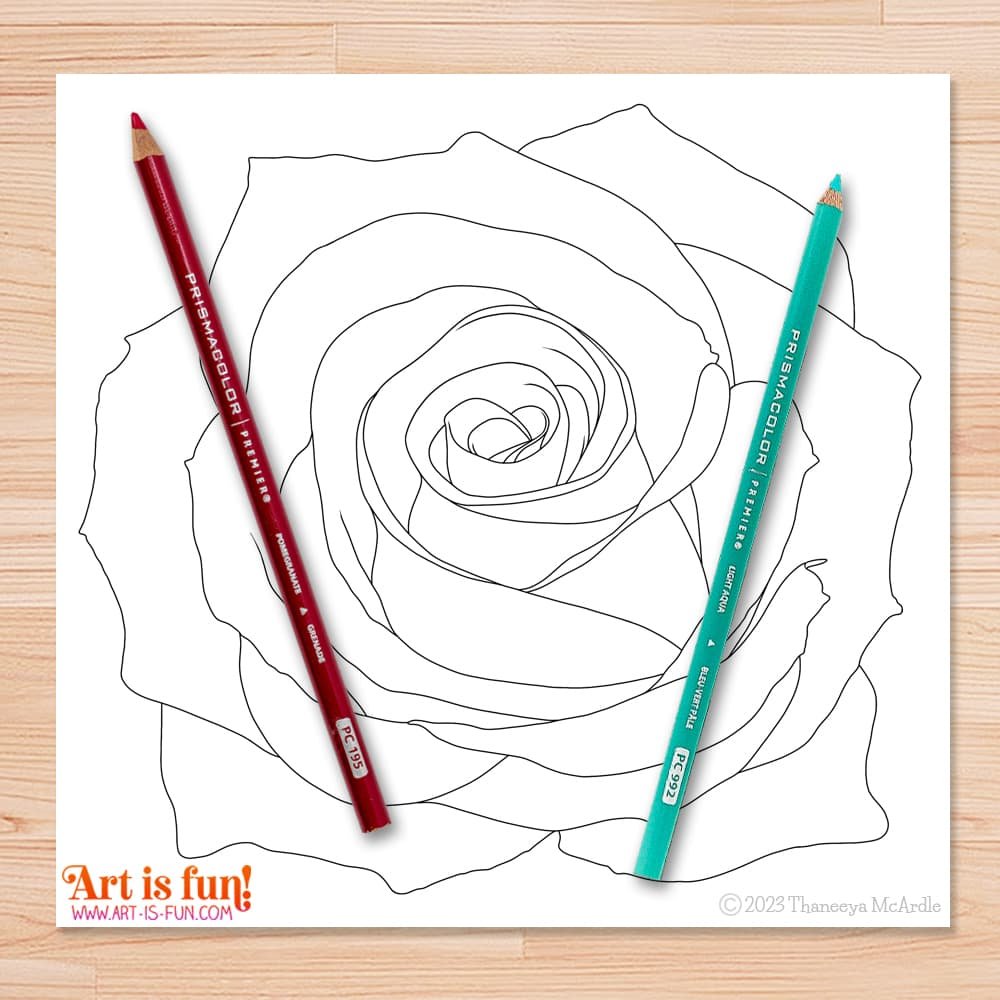
This line art is available for download!
If you’re aiming for realism, then it’s essential to create an accurate line drawing. For this rainbow rose, I spent about 3.5 hours drawing the rainbow rose in Procreate, as I experimented with getting the colors and values just right. When I was satisfied with the digital painting, I traced over top of it (still in the Procreate app) to create the line art (shown here).
When it comes to creating realism with colored pencils, your final artwork is extremely reliant on your line art. This is because colored pencils aren’t a very forgiving medium, so it’s best to get the proportions and composition just right before you begin using colored pencils.
A medium like acrylics is very forgiving, because if you make a mistake, you can just paint right over it and start again. But with colored pencils, it’s much harder to cover over mistakes. Even when using an electric eraser, it can be difficult (if not impossible) to get back to the white of the paper (or whatever the original color of the paper is).
Tip #2 Transfer your line art
Rather than sketch your line art directly onto your drawing paper, I find that it’s best to create your final line art on a separate piece of paper (or create it digitally, like I did for this drawing), and then transfer your final line art onto your drawing paper. Here’s why:
When you sketch on colored pencil paper, the pressure of your pencil can leave little indentations on your paper, which can become problematic later on.
It’s totally normal to erase a lot when creating a sketch. Depending on the paper, erasing too much can damage the paper (particularly the tooth of the paper).
If you sketch with graphite, the graphite typically has a bit of shine that can look odd when colored over with colored pencils, especially if the graphite is dark or heavy.
So what’s the best method for transferring your line art?

I prefer to print out my line art. Here the line art opacity has been reduced to 10%, so you can barely see it when you print it out! This is ideal for creating realistic art, because the line art essentially disappears when you layer colors on top.
My top 3 suggestions for transferring your line art are to use either:
graphite transfer paper
lightbox
printer
Let’s take a look at each option:
You could use graphite transfer paper (which I did for many years), but then you might run into the same problem described above, where the transfer paper leaves too much graphite on your paper, so you have to do a lot of erasing, which can damage the texture of the paper.
An excellent alternative is to use a lightbox to transfer your final line art onto your drawing paper. I prefer this method over using transfer paper.
My absolute favorite method (and by far the easiest!) is to simply print my line art onto my final drawing paper. The paper I use, Strathmore 300 Bristol Smooth, runs perfectly through my inkjet printer. I set the line art to about 10% opacity, print it out, then I’m ready to get started!
Tip #3 - Establish your values
Value refers to how light or dark something is. Typically, your darkest values will be the shadows areas and your lightest values will be the highlights. The colors in between are your mid-tones.

Below you can see a screenshot from my colored pencil tutorial video as I establish the darkest values in my realistic rainbow rose drawing. The image in the upper left is my reference image. I painted my rainbow rose in full-color in the Procreate app, and then created a desaturation layer to better see the values.
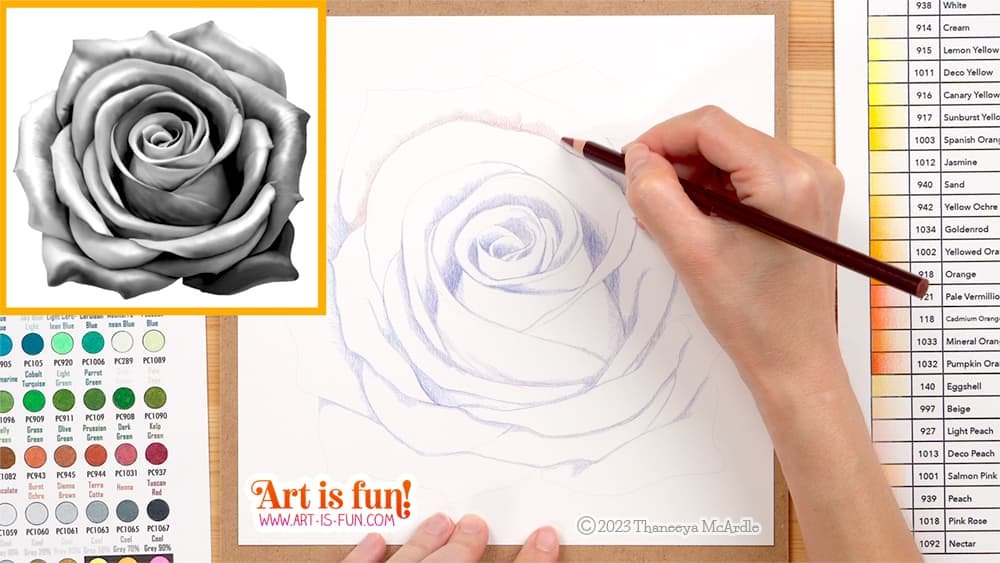
When it comes to using colored pencils, it can really help to establish your values first, by lightly drawing in the darkest areas on your artwork, like you see in the example above. The key is to draw your shadow areas very lightly to start with, because you’ll be layering many more colors on top.
By establishing your darkest values first, you can more easily gain a foothold into what the rest of your drawing will look like. Look at how the form of the rose above is already starting to take shape, even though I’ve only lightly filled in the darkest areas!
Tip #4 - Press very lightly
If you want to create realistic art with colored pencils, then you need to train yourself to press very lightly for most of the drawing process. This is very important!
When you’re first starting your colored pencil drawing, it can be very tempting to press hard in order to make the colors appear more vibrant. But that won’t yield the most realistic results. To create realism with colored pencils, you need to layer lots of different colors on top of one another to create gradual transitions and smooth blends (for example, to go from light to shadow, or to blend from one hue to another hue). When you press too hard with your colored pencils, the pencil pressure starts to damage the tooth of the paper, limiting the number of colors you can layer on top.
Plus, your hand will quickly start to hurt from using so much pressure!
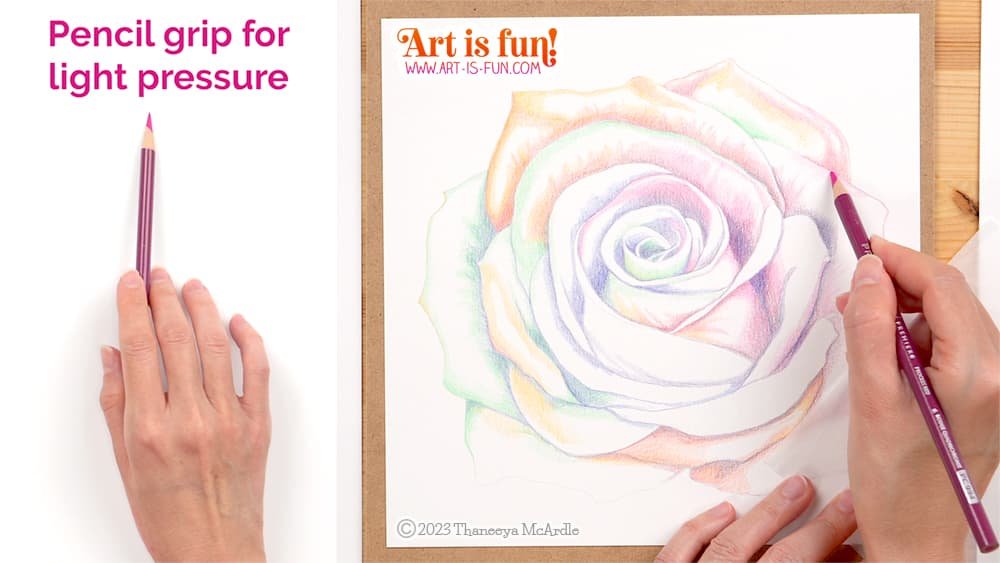
Above you can see another screenshot from my colored pencil demo. Many artists find it helpful to loosely hold the pencil farther back on the barrel (as I’m demonstrating above left) because this forces you to press lightly. (Some people hold their colored pencils even farther back!) When holding your colored pencil at this angle, you’re also forced to color with the edge of your colored pencil, rather than the tip, so it’s important to keep the tip of your pencil long and sharp.
This technique can work well if you’re coloring in large areas, because the long edge of a sharp colored pencil can fill in large areas more quickly than just using the tip of the pencil. But I find that for detailed areas, you need more control, so it’s better to train yourself to press very lightly while holding your colored pencil closer to the tip (as I’m demonstrating above right).
Tip #5 - Glazing
Pressing lightly is actually the secret to glazing, which is our next tip!
Glazing is an artistic technique that goes back centuries. Glazing was traditionally a painting technique, but you can also glaze with colored pencils. Glazing with colored pencils involves layering transparent colors on top of one another to achieve those gradual transitions of color that we talked about in Tip #4.
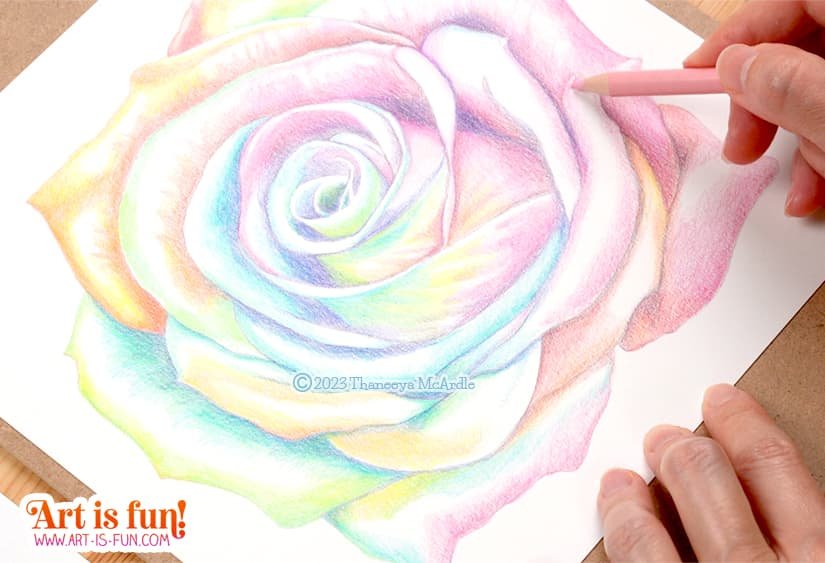
In the screenshot above, you can get a good look at all the light layers of colored pencils that I’m adding to this drawing. To make this rainbow rose colored pencil drawing look as realistic as possible, I have to create a lot of ombrés (transitions from one color to another color). I glaze my colors by pressing very lightly, so that the color that’s deposited on the paper is transparent, allowing the colors underneath to show through. In this way, I create gradual transitions in hues and values throughout the artwork.
Pressing lightly is the most important technique for glazing with colored pencils, which can lead to beautiful chromatic nuances in your colored pencil drawings. The results you can achieve with glazing are so much more dynamic than if you use only a single flat color.
Tip #6 - Avoid black
When it comes to creating realistic art, black is typically considered a “deadening” color, no matter what medium you’re using. This is particularly true if you’re drawing or painting natural objects, animals or people. Pure black looks really unnatural, so it’s best to either avoid using black altogether, or use it minimally.
If you do want to use black, it’s best to apply it lightly, and then layer another color or two, or more, on top of it. Layering colors on top of black helps make the black look more natural, and fit in better with the colors around it.
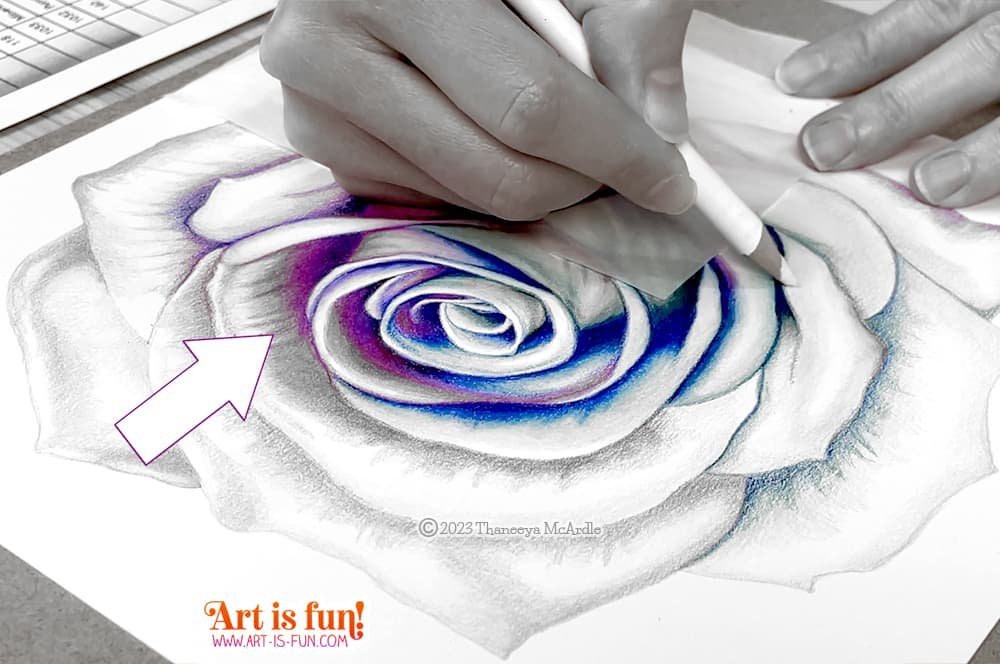
Instead of using black, you can layer a variety of dark colors on top of one another to create the darker tones, as I did in my shadow areas on this rainbow rose. Take a close look at my darkest areas below:

To create those dark areas, I layered a variety of darker colors on top of one another, avoiding my black colored pencil completely. As a result of this layering, you can see below how those dark areas are dark, but don’t look black. This is what helps give this rainbow rose a gorgeous sense of luminescence!
Tip # 7 - Be patient!
Creating a sense of realism in your colored pencil art is matter of patience and practice. Colored pencils are a very slow medium, so don’t expect fast results. Instead, it’s best to sit back and enjoy the process! Colored pencils are the perfect medium for getting into a state of creative flow, in which your mind is engaged so much in what you’re doing that time passes by quickly and you don’t even notice. This state of flow is a very enjoyable and meditative experience, so definitely embrace it when it comes!
Tip #8 - Create more contrast
For a truly dramatic flair, consider adding a black background to your vibrant colored pencil art!
Adding a black background isn’t appropriate for every drawing, of course, but if the concept does work with the subject and style of your artwork, then adding a black background can really make the whole thing pop! It helps separates the foreground from the background. Notice how the black background frames the entire rose, creating even more of a focal point that directs your eye to the colorful rose in the center of the paper!
I used a black Copic Sketch Marker to carefully color in the background behind the rainbow rose. Alternatively, you could use acrylic paint, acrylic ink, India ink, watercolor, gouache or colored pencil to color in your black background.
p.s. - I did mention in Tip #5 that you should avoid black when creating realistic colored pencil drawings, but in that case, I was referring to the main subject of the artwork. For this drawing, I didn’t want the background to be realistic. I just wanted the rose to be floating there in empty space, in which case, adding a black background is an effective way to create the ultimate contrast. 😍
I hope these tips on how to create realism in your colored pencil drawings have been helpful to you!
You can watch me create this vibrantly realistic rainbow rose with colored pencils in this video. Be sure to watch the whole thing, especially if you want to see this artwork come to life from start to finish!
Drawing realism with only 3 colors?!
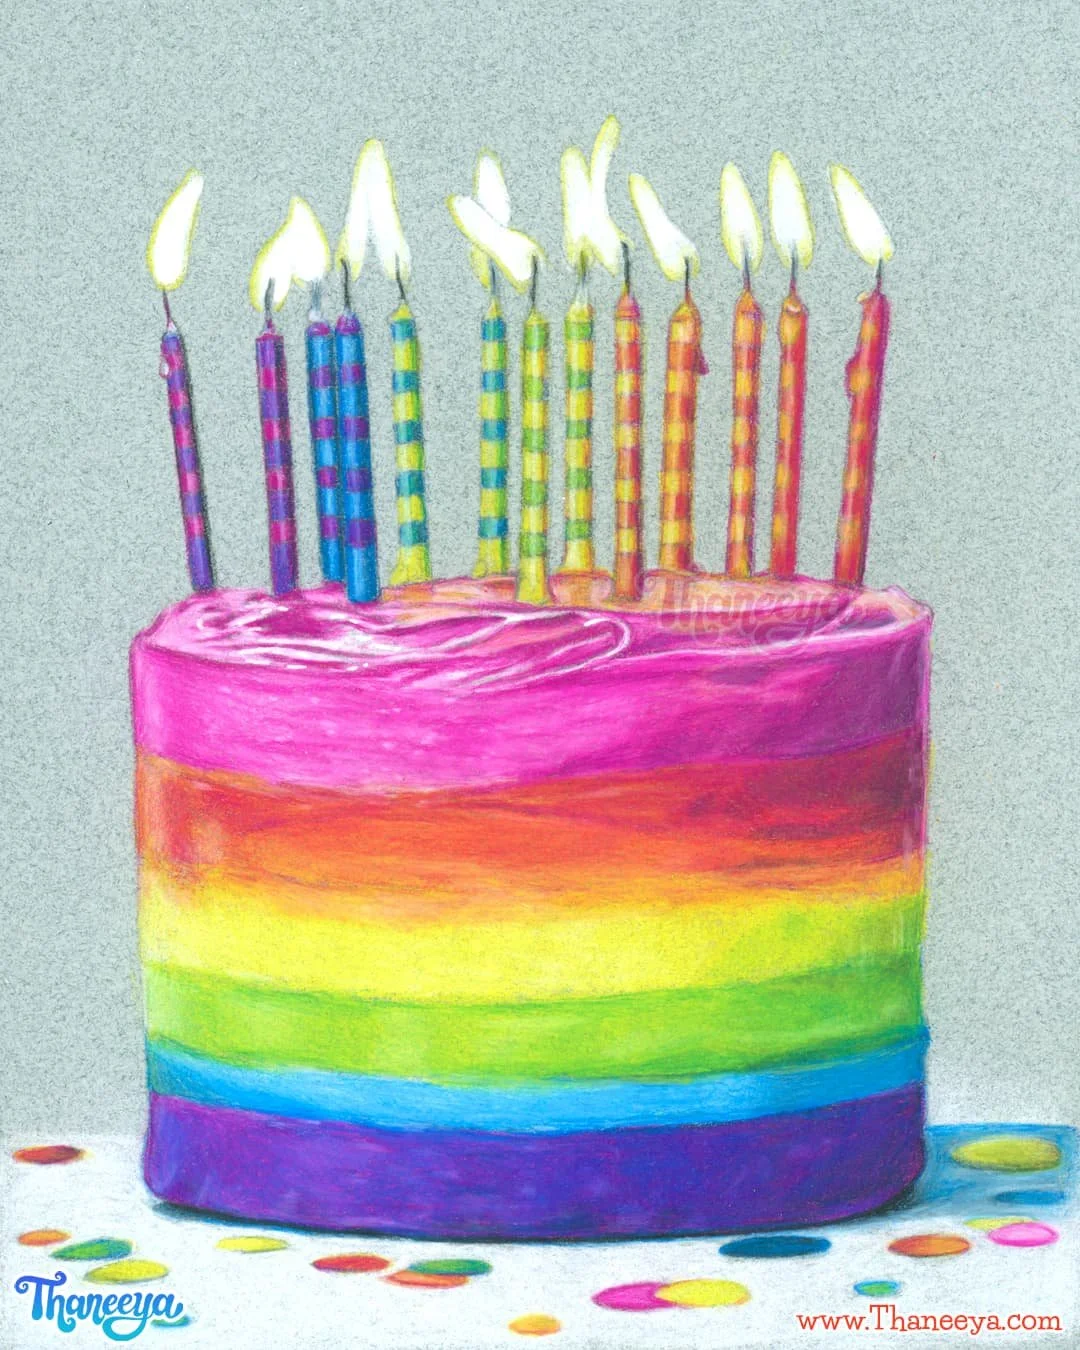
If you enjoyed seeing how I built up realism in the rainbow rose, you’ll love this next challenge! This rainbow cake was also drawn with colored pencils, but this time I used only three colors: cyan, magenta and yellow - plus white and black! By slowly layering and blending those CMY primaries, I was able to mix every hue in the cake and candles while still making the cake look realistic and 3-dimensional.
You can watch the entire cake drawing in real time and follow along in a 3-hour, 7-part bonus lesson inside my course Color Theory Made Fun! The lesson comes with printable line art so you can print the cake, tape it to your drawing board, and practice building up realism one transparent layer of colored pencils at a time. It’s a fantastic way to train your eye to see subtle color mixes and to experience just how much is possible with such a limited palette!
Learn how to choose colors!
Speaking of color theory… Do you ever feel frustrated when choosing colors for your art? I would LOVE to help you with that, because working with colors shouldn’t be scary, it should be fun! 🤩 I made over 8.5 hours of video lessons that I compiled into the ultimate resource for color beginners: Color Theory Made Fun! You'll learn how to see, understand, and use color with confidence, through a series of engaging video lessons, real art examples, and a printable workbook packed with playful exercises. Color Theory Made Fun is designed walk you step-by-step through the secrets of understanding color as you make your own color wheels and learn all the secrets of color harmonies! Whether you're painting, drawing, or designing, this self-paced course gives you lifetime access to tools that will transform how you think about color, so that working with color becomes a joy that you look forward to every day.
Keep learning!
Get an overview of different colored pencil brands and their various qualities. If you’re a beginner, you’ll want to read this!
Learn more about various colored pencil tools and accessories that can really come in handy when making colored pencil art.
Read about the best paper for colored pencils!
Check out this colored pencil tutorial to learn how to color in a whimsical illustration!
Download my FREE Prismacolor Color Chart for their set of 150 colored pencils.
Level-up Your Colored Pencil Skills!
Make the most of your new colored pencils with these easy-to-follow video lessons from Skillshare! Get instant access with a 14-day free trial or use our code, ARTISFUN30, to get 30% off annual membership! As a Skillshare affiliate I get a small commission that helps support this site.