How to Use Pastels
Learn how to use pastels by creating a fun pastel portrait!
In this pastel painting workshop, I'll demonstrate some basic pastel painting techniques that you can use when you draw and paint with pastels.
The purpose of this pastel portrait tutorial is to experiment with the medium of pastels and above all, to have fun!
In this pastel painting lesson, we won't worry about getting things "perfect". We'll just focus on learning how to draw with pastels and enjoy ourselves in the process!
Materials used:
I've provided links below to the relevant products so that you can easily find them on Blick Art Materials, my favorite online art supplier. I'm a member of Blick's affiliate program, which means if you make a purchase after clicking on one of these links, I'll receive a small commission (at no extra cost to you). Your purchase helps support this site and keeps it free of ads. Click here for more info.
I painted this pastel portrait using Prismacolor NuPastels, which are hard pastels that come in thin, rectangular stick form. Because these pastels are hard (as opposed to soft ones, like Rembrandt, Schmincke, or Sennelier), they are less messy and it is easier to achieve tighter control and greater detail - making them a fun choice for learning how to use pastels.
The pastel paper that I used was Sennelier La Carte Pastel Card, which has a slightly abrasive surface. This is an excellent pastel paper because the pastel adheres easily to the surface, yet it is still easy to blend. The pastel pigment shows up extremely well on Sennelier La Carte, making the colors rich and strong. This is a great paper for learning how to use pastels.
I also used a Prismacolor colored pencil, acid-free tape, and a piece of masonite, which I'll explain in the pastel portrait tutorial.
For cleanliness, you'll want to either keep some moist cleaning wipes nearby or use latex finger cots.
How to Use Pastels Step-by-Step
For this pastel painting workshop on how to use pastels, I used a photo of my friend Kevin dressed as a cowboy as the reference photo. I chose this photo because I felt it had a lot of personality and would make a fun pastel portrait.

Sennelier La Carte Pastel Card comes in individual sheets of 19" x 25", so I cut the paper down to the size that I wanted. I measured out an 8" x 10" area for the drawing using a Prismacolor colored pencil. When I cut the paper, I left a 1/4 inch margin around all 4 sides of the paper. This allows room for a mat, if I decide to get this pastel portrait painting framed.

Using acid-free art tape, I adhered the pastel paper to a sturdy piece of 9" x 12" masonite. This will keep the pastel drawing in place as I work on it, and gives me a flat, smooth work surface.
Acid-free art tape is an ideal tape to use, because it peels off easily, without lifting off any of the paper underneath. Because it is acid-free, I don't have to worry about any potential long-term damage caused by the acidity that is in normal tape, such as masking tape.
I cropped the photo of Kevin to match the size of the paper:

Using a light Prismacolor colored pencil, I sketched in the outline of the portrait. The reason I used colored pencil for this, and not pastel, is because pastel smudges easily. I need the outline to remain clear (and not smudge away) while I fill in the colors with pastel. Drawing your outlines in colored pencil is a good tip when learning how to use pastels.

Using a mulberry colored pastel, I drew in the darks. I didn't want to use black for two reasons:
1. Because black would be too dark for this stage. My main goal at this stage is to create a build-up of color.
2. Because black pastels tend to lack depth and look lifeless. Black should only be used sparingly!

I added two more colors. The face is starting to take shape.
Note that I am not using "normal" colors. For the purposes of this pastel painting tutorial on how to use pastels, my goal is not to create a "normal" portrait, but instead to create a fun, funky one that is full of life and color! I want to create a portrait that is whimsical and lighthearted. I'm not at all concerned about getting the proportions exactly correct or creating an exact likeness of Kevin. I just want to have fun and explore the medium of pastels.

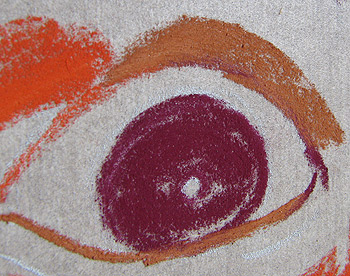
At this point, I have not blended the pastel at all. That's for later. Here is an extreme close-up of how the pastel looks on the paper:
Next I add more colors. I still haven't blended yet. Take note of how pastel looks when it hasn't been blended. There's a really nice sense of immediacy and energy to pastel that isn't blended.
If I wanted to, I could create the whole pastel portrait without blending at all. But for the purposes of this pastel painting tutorial on how to use pastels, I want to show you a few different pastel painting techniques, so I'll blend the pastel in a minute.
At this point, I'm laying color side-by-side, rather than doing any overlapping.

Now I've blended the pastels using my finger. See what a difference it makes? Compare the image below with the version above.
Pastel painting tip:
After you blend pastel with your finger, you will need to either wash your hands or use moist cleaning wipes for easy clean up. If you don't clean off your fingers, the pastel that is on your fingers will smudge into whatever color you use next.
While blending helps to smooth out the pastel painting, it also loses a sense of raw immediacy and energy. It's my goal now to bring some of that energy back.

Compare the two close-ups below to see how the blended pastel looks different from the non-blended pastel:

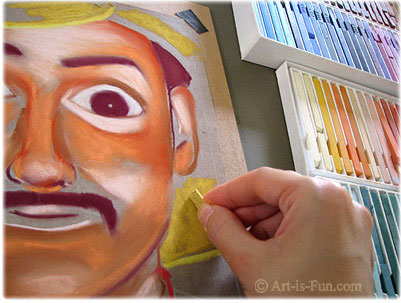
Now it's time to start filling in his hat, his shirt, and the background. For his, I use a different pastel technique. I want to fill in a lot of space as quickly as possible, so I use the side of the pastel, like so:

If you need to, it's totally okay to break off a piece of pastel so that it's the right size. This piece of pastel needed to be small enough to fit into the tight spaces on the paper.
In the picture below, you can see how I use a different color to add some shading to the hat. I do this by adding new color directly over top of the previous color. I used the side of the pastel just like I did when laying down the yellow.

Here is how it looks with nearly all the base color laid down:

It's coming along! His face is a bit too orange-y, so it's time to start lightening it up. I applied a light pink color:

Then I blended the colors:

Now it's time to darken the darks, still without using black!

And now it's time to brighten it up again! You see how at this stage, it becomes a balancing act of light and dark? With the mid-tones already down, the main goal now is to keep adding lights and darks until the face really starts to take form.

Here is a close-up so you can see the variety of strokes and the different pastel painting techniques used so far in this pastel portrait tutorial:

Now it's time to add detail to his cowboy hat, his bandana and his shirt. I did this by simply drawing single line strokes to form the patterns in his clothing and the lines in his hat. I'm not going to blend these in, because I want them to be sharp details.

Lookin' good, but not quite done yet. I could consider it finished, but I want to try something else. Although I really like it, his face still feels too "warm" for my taste. So I lighten it up by adding some strategic blues:
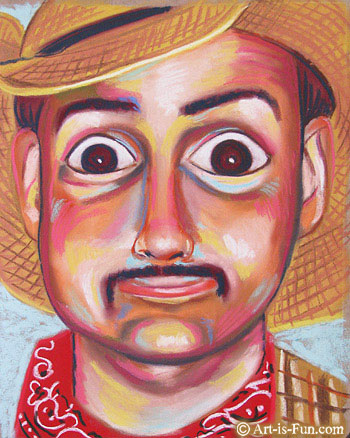
Voila, a finished pastel portrait!
What do you think, did it look better before or after I added the light blue highlights to his face? I'm still not sure myself. But you never know how something will look unless you try it, and that's part of the fun of learning how to use pastels!
This pastel painting workshop showed you how to use pastels using several pastel painting techniques. This is the first of what will be many more pastel painting tutorials in the near future!
Read More
Pastel drawings and paintings are stunningly beautiful, with rich textures and deep colors. However, working with pastels requires some caution. Read an overview of pastel art, along with pros and cons for using pastel.


