Transfer Paper
how to use transfer paper to transfer your image
Transfer paper is one of the greatest inventions ever for artists. It's similar to carbon paper, which was used a lot in the "old days" for record-keeping purposes, but is not used as often now. For younger folks who might not be familiar with the concept, to make an "instant copy" of something you would place a sheet of carbon paper underneath your writing paper, and a copy of what you wrote would be transferred to the sheet below. Well, transfer paper (also known as graphite paper) works in exactly the same way, only using erasable graphite.
Wax-free graphite paper is better for artists. I would not recommend using carbon paper for art-transfer purposes because it's coated with wax which makes it difficult to erase (because the carbon copy was meant to last a long time). Transfer paper that is designed specifically for artists is a lot cleaner than carbon paper. Transfer paper is wax-free, leaving behind less residue, and is easy to erase. It also comes in different colors.
However, this means that the transfer from wax-free graphite paper can be lighter - something you see people complaining about in the reviews. If you prefer a bolder transfer, MyArtscape offers a Waxed Graphite Paper that is designed to leave bolder lines that are still erasable.
I've provided links below to the relevant products so that you can easily find them on Amazon. As an affiliate, I earn from qualifying purchases. Your purchase helps support this site.


Let me tell you about the wonders of graphite paper. Before I discovered transfer graphite paper, I used to spend hours drawing the images in the reference photo onto the canvas. I occasionally used the grid method, but mostly I pored laboriously over every detail in the original image, endeavoring to replicate the image exactly on the canvas. While it was artistically-rewarding and ego-gratifying, eliciting plenty of ooh's and aah's from everyone - it was also intensively time-consuming. By the time I learned about artist transfer paper, I had already proved to myself and others that I knew how to draw. I no longer needed to constantly prove my drawing skills with every single artwork that I made, so I felt comfortable transitioning to the use of artist graphite paper. Basically, artist graphite paper speeds up the art-making process, allowing me more time to spend conceptualizing and creating new works of art.
There is no doubt that drawing skills are fundamentally important for any artist. All artists need to know how to draw - how to render what they see. But once you get to the stage where you are comfortable with your skills, when you feel you really know how to draw, it's perfectly acceptable to use artist's tools such as graphite paper, the grid method or projectors. They are artist tools, just like a paintbrush is a tool. Anyone can pick up a paintbrush, but not everyone can create a masterpiece. Anyone can use graphite paper to "trace" an image, but what happens after that (and even the tracing itself) depends upon the skill level of the artist. More importantly, no one can create the vision that you see inside your head - so it's up to you to put that brush to canvas and show the world what you see!
How to use transfer paper:
- Get a paper photocopy or inkjet print of your reference photo. Make sure that the image is printed at exactly the same size that you want to paint it.
- Cut out a piece of transfer paper at the exact same size as your reference photo.
- Gently tape the transfer paper to the canvas. Make sure that the "messy" side of the transfer paper is facing down, towards your canvas, and the "clean" side is facing up. Use an archival artist tape to tape the graphite paper to the canvas. Artist tape is ideal because it is acid-free and removes easily without leaving behind any residue.
- Place the reference photo on top of the transfer paper. Make sure it is positioned on the canvas exactly as you want it. When it is positioned correctly, tape it to the canvas. Be sure to use artist tape!
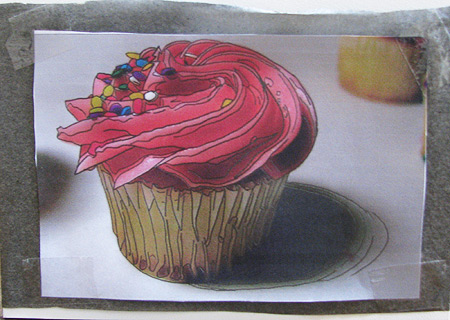
Here is an example of a 4" x 6" reference photo taped to a 5" x 7" wood panel, with graphite paper in between:

- Double-check that the tape on the transfer paper and the tape on the reference photo are tight and secure. If the tape is loose, and either one comes undone during the transfer process, it will be really difficult to get everything to line up exactly right again!
- Now you can start tracing! I recommend using a mechanical pencil to do the tracing, because it always retains a sharp point. Be sure to trace all the contours (outlines) of all the objects, as well as all the shadows and highlights. You'll also want to make a mark any time there's a color change, whether it's from one hue to a totally different hue, or a hue that is gradually getting darker or lighter. The important thing is to make a mark noting every visual piece of information that you will need to create your painting.
Here is how the above reference photo looks after tracing:
Compare that with the photo of the reference image before the tracing, and you can see how much detail you need to capture. Especially take note of the lines on the right part of the shadow. All those lines signify subtle changes in the strength of the shadow. Make sure to record important pieces of visual information such as this!
Here's how it looks when you remove the graphite paper:
more examples:
Take a close look at this painting in progress:
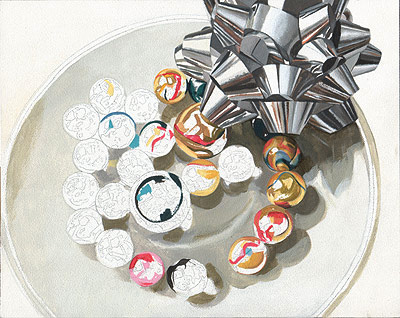
The still life above is another example of how detailed you need to be. This painting is a work-in-progress of a silver gift bow on a plate with a bunch of colorful marbles. If you look closely, you can see the lines that were traced to form all the nuances of each marble. Some of the marbles are in various stages of being painted. Some only have a few dabs of paint here and there, whilst the ones closest to the silver bow contain more paint. So you can see how important it is to take note of each variation of color, light, shadow and form!
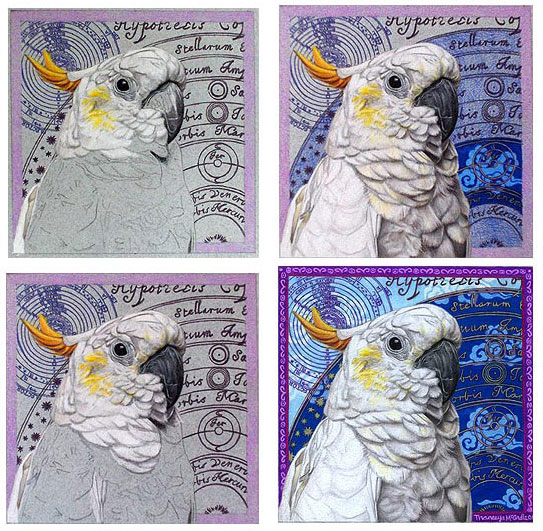
You can see another example of the use of transfer paper in the artwork below. The main features of the bird have been marked using transfer graphite paper. These two work-in-progress images show how the visual information that is recorded by the transfer paper serve as visual pinpoints for the placement of each feather. The bird was then drawn in using Prismacolor Colored Pencils. You can see how the image progresses, followed by the completed drawing.
Tips for using transfer paper
If you're not sure whether you're pressing too hard or too soft, gently and carefully lift up a corner of the reference photo and transfer paper to see what's going on underneath. (Be careful to only lift up a tiny piece, because you don't want to throw everything out of alignment.) You need to use just the right amount of pressure. If you press too lightly, the image won't transfer very well. If you press too hard, the transferred lines may be too dark. Dark lines are not a problem if you are painting, as you can just paint over them, but the excess graphite will smudge when painted over. If you will be creating a drawing, then take care not to press too hard.
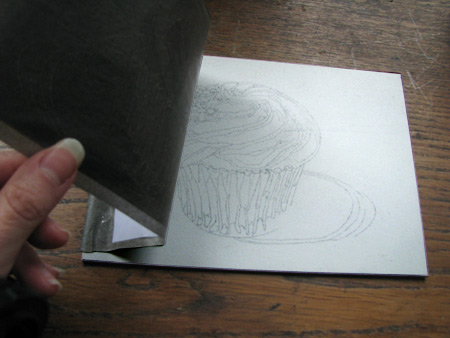
When you're finished, slowly release the artist tape from the canvas, lifting each corner one by one. I recommend inspecting the tracing closely as you lift each corner. Leave one side still taped to the canvas to form a hinge (as in the cupcake example above), so that if you see some part that you may have overlooked, you can try to replace the graphite paper and reference photo and redo that area.
Graphite paper can be smudgy, so wash your hands immediately after removing the paper from your canvas. You don't want extra smudgy fingerprints on your canvas (or clothes or anything else for that matter!).
If you make a purchase via the links below I receive a small commission, which helps support this site.
Since graphite paper can be smudgy, the trace can be smudgy as well. Therefore if you're not planning to paint or draw on it right away, make sure to leave it someplace where it won't be disturbed and nothing will rub against it. One idea is to carefully wrap it in glassine and tape a piece of foamboard to the front of the piece, to act as a protective barrier.
If the graphite is too dark upon your canvas or paper, simply use a kneaded rubber or other eraser to blot out the excess graphite. Really, all you need is a hint of a line to remind you what goes where. Dark lines aren't necessary!
Likewise, don't allow dust to settle on your canvas, because if you try to wipe or brush off the dust, you'll smudge the graphite tracing. Big mess!
You can reuse graphite paper a few times before the graphite wears out, so it's economical to save a sheet and use it a few times!


This is Page 10 of a 15-page guide explaining how to paint photorealistically.
Let’s Draw Course
If you’d like to take your drawing to the next level, check out my review of the Let’s Draw Course! It’s a comprehensive video course (with ebook materials) taught by two experienced instructors who’ve taught their methods to thousands of students!